Showing posts with label Superbowl. Show all posts

January 28, 2014

Vegan Taco Chili Layer Dip


It's the end of January, and that means it's time for my annual Super Bowl recipe post! 

For the past two years, I've posted new versions of layer dips because that's my favourite thing to eat while watching the big game (or maybe I just like having an excuse to eat chips and dip for dinner!).

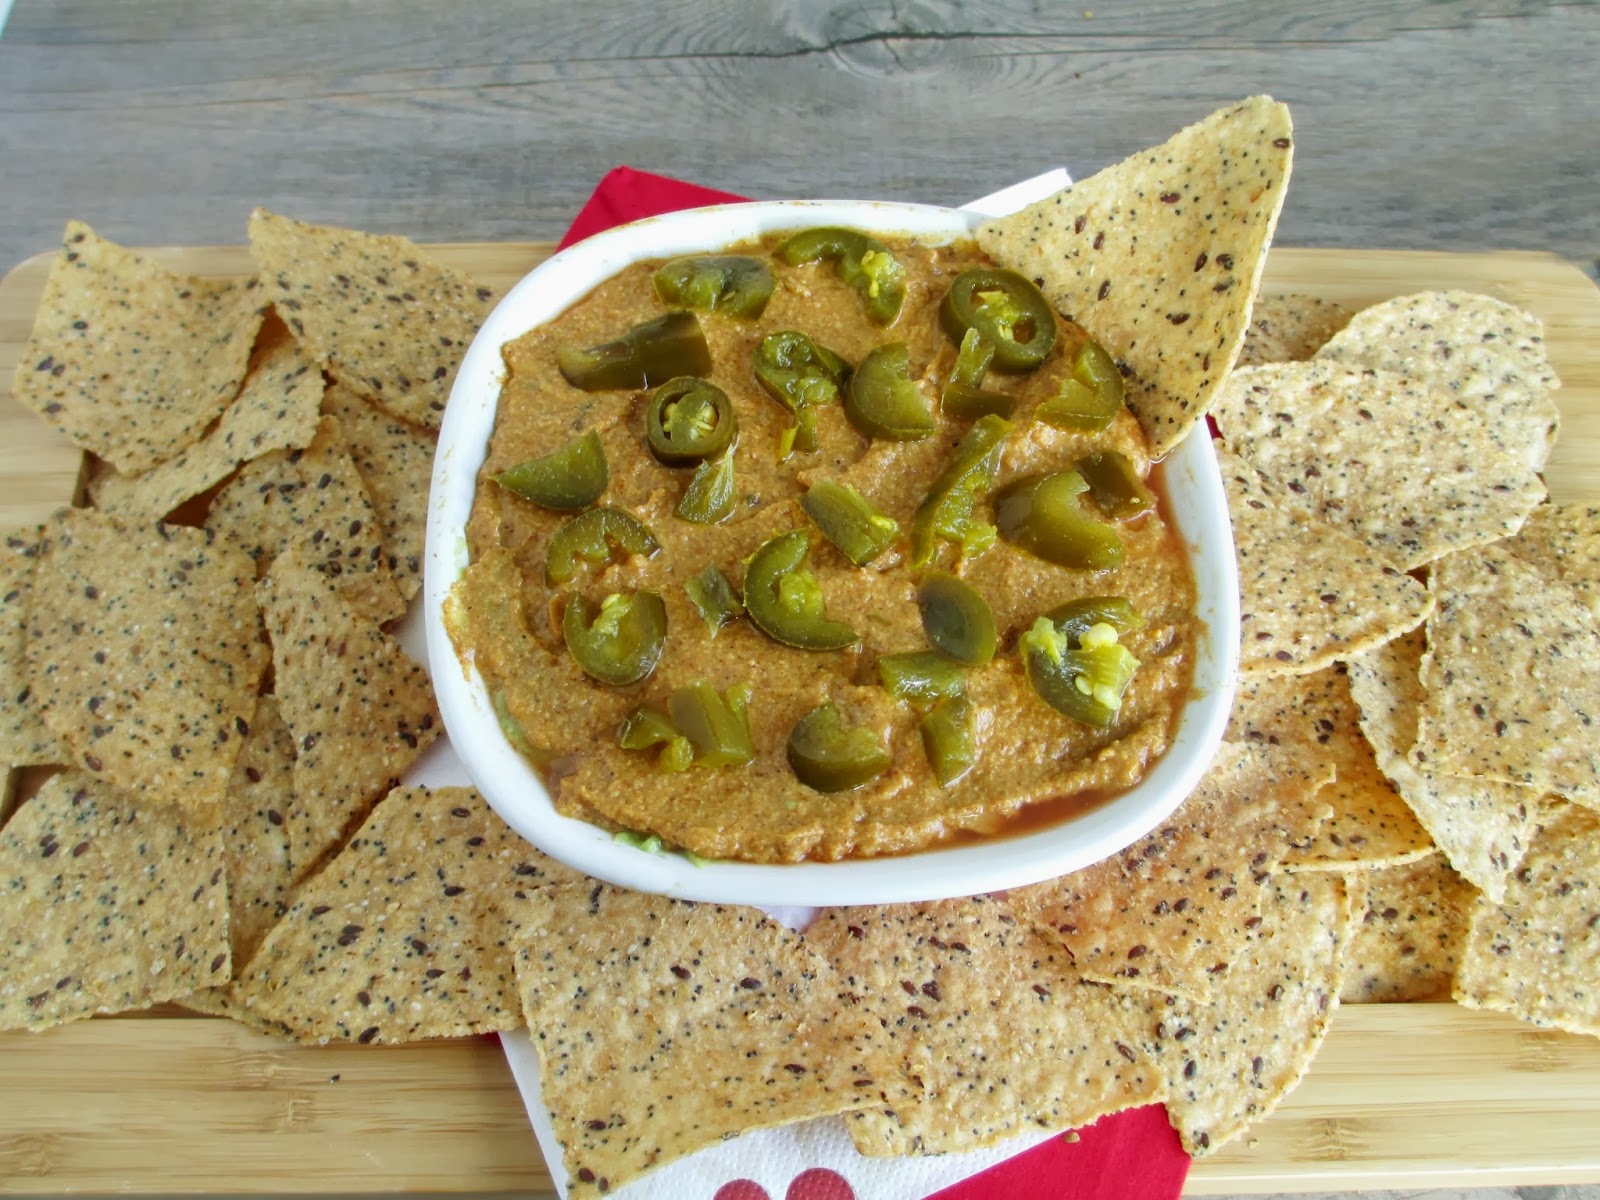
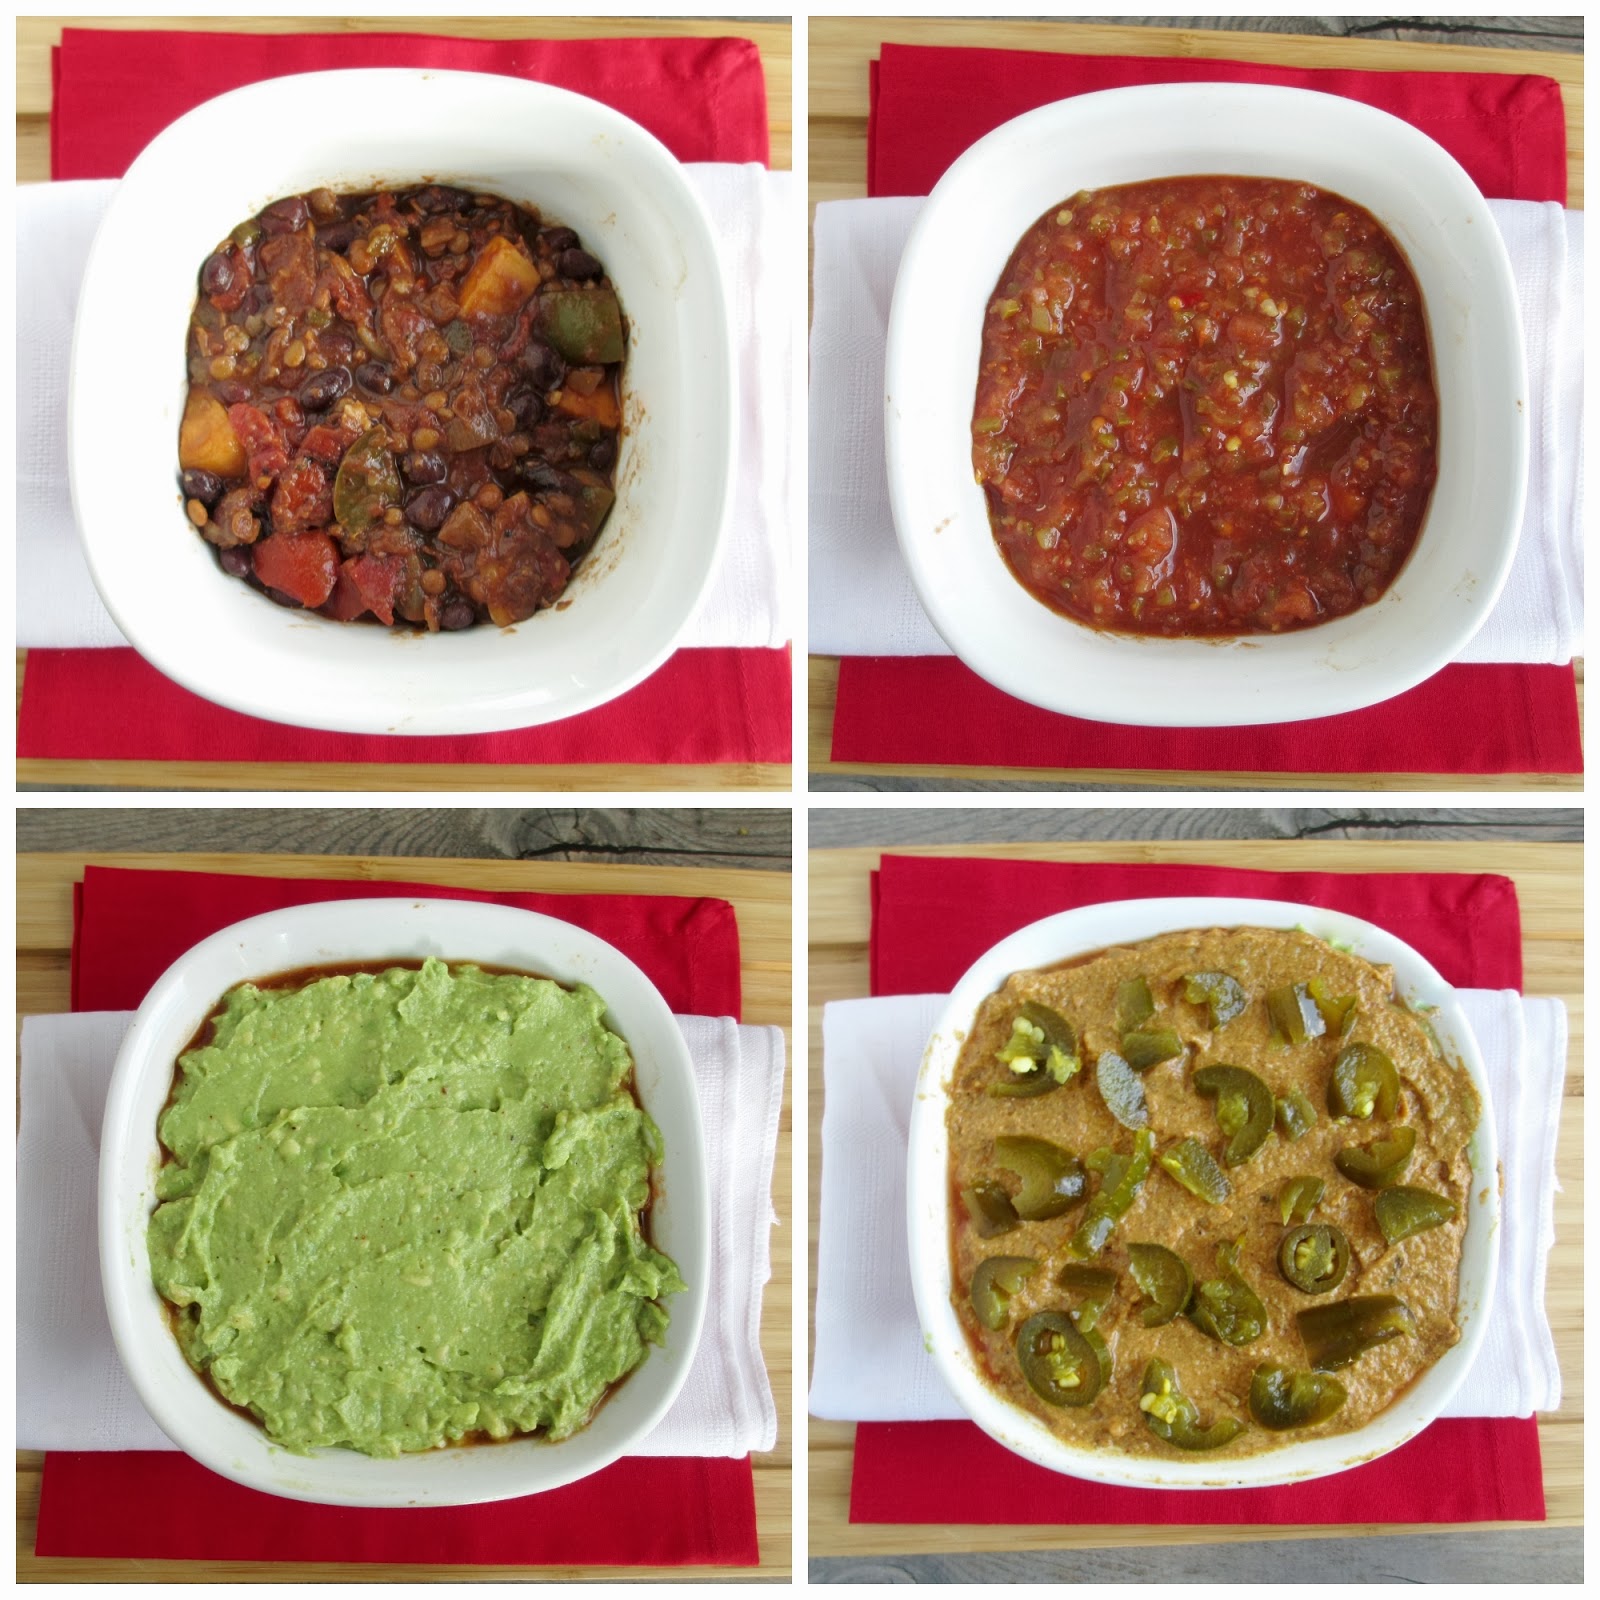
This year I tried a new spin on my usual layer dip by making a chili version inspired by a recipe in the Vegan Planet cookbook. This chili taco dip has four main layers: leftover vegetarian chili on the bottom, salsa, mashed avocado, and a vegan "cheese" sauce made with nutritional yeast instead of regular shredded cheese, plus some pickled jalapenos as an extra topping. 

If you can manage to get your chip through all the layers at once, you get the perfect combination of flavours and textures - chunky beans and veggies, smooth salsa, creamy avocado and cheese sauce. There's a bit of spice in each layer too, from the chili to the kick of the jalapenos, but I found it to be just the right amount of heat!

This is a pretty easy dish to whip up if you've got leftover chili already sitting in the fridge, like I did from this veggie black bean and lentil chili recipe. Then all you need to do is mash an avocado, make the cheese sauce (which really only takes a few minutes), and then the fun part - putting all the layers together!

If you're watching the Super Bowl this weekend, what do you plan on making? Last year I contributed baked pickle chips, buffalo cauliflower wings, and monkey bread to our game day menu but I haven't decided what I'll be having yet this year (besides layer dip of course!). If you're looking for more ideas, feel free to check out all of my other Super Bowl recipes!
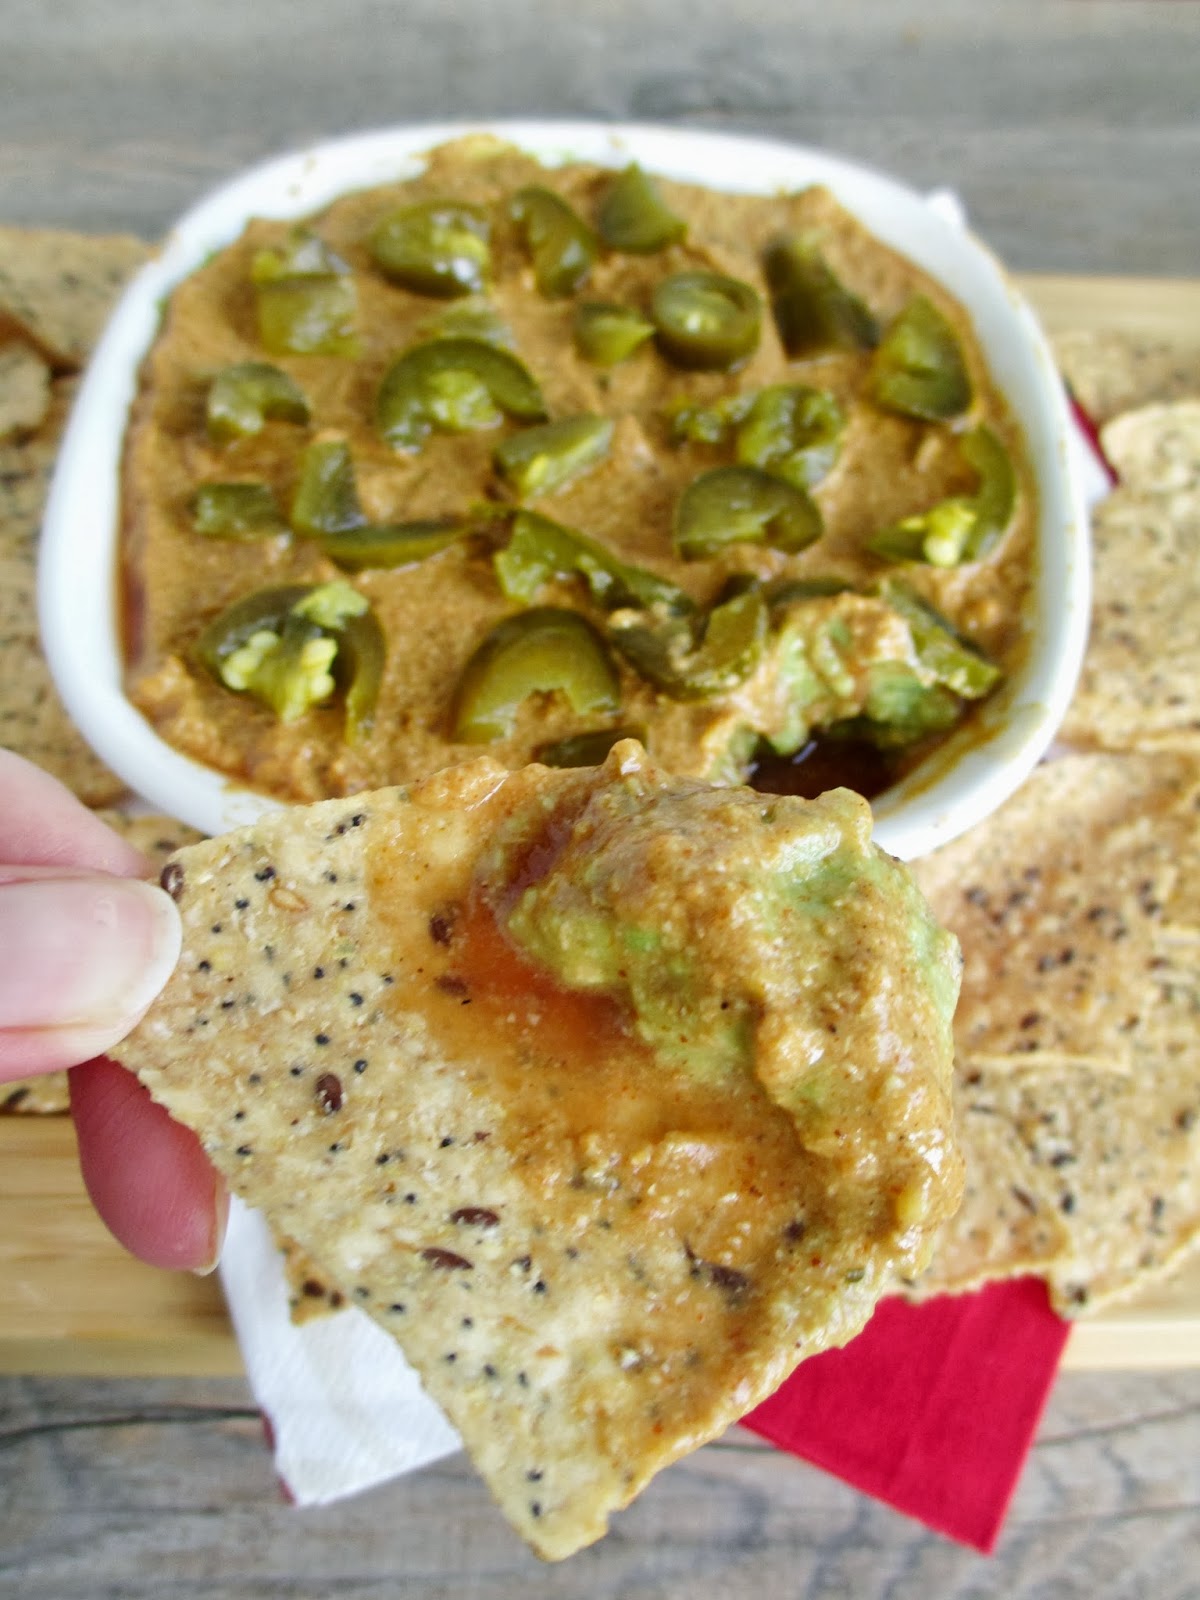

Vegan Taco Chili Layer Dip
Adapted from Vegan Planet

1 cup vegetarian chili
1/2 cup salsa
1 ripe avocado
1/2 tbsp lime juice
1/4 tsp salt
Ground pepper
Dash of taco seasoning
1 recipe nacho cheese sauce (recipe below)
Handful of pickled sliced jalapenos, chopped


Place the chili in the bottom of a small dish (I used a 20 oz, 5" square ceramic dish). Note: if there is liquid in your chili, try to drain it out first so that your dip doesn’t get too runny. Reheat the chili in the microwave until it reaches room temperature.

Next, layer the salsa over the chili, spreading it out into an even layer with a small spatula.

Scoop out the insides of the avocado (remove the pit) into a bowl and mash until it is fairly smooth. Add the lime juice, salt, some freshly ground pepper, and a dash or two of taco seasoning. Stir to mix. Spread the avocado mixture over the salsa layer.

Spread the nacho cheese sauce evenly over the avocado layer. Finally, sprinkle some jalapeno slices over the top (use as much or as little as you like). Serve immediately, or cover and store in the fridge. Bring to room temperature (or reheat slightly) before serving.

Serves 2-4 (depending on how hungry you are!)


Nacho "Cheese" Sauce

1 tbsp chickpea flour
1/4 cup nutritional yeast flakes
1 tsp tex-mex or taco seasoning
1/4 tsp smoked paprika
Pinch of salt
1/4 cup + 2 tbsp almond milk


Heat a small saucepan over medium heat. Add chickpea flour and toast, stirring often, for 2-3 minutes. Stir in nutritional yeast and spices. Add almond milk and reduce heat to medium-low. Stir constantly for a few minutes, until mixture has thickened. Remove from heat and transfer to a bowl to cool.

Makes about 1/3 cup


January 29, 2013

Layered Sweet Potato Dip


With the Super Bowl coming up this weekend, I've been thinking about snacks that I could make to eat while watching the game. I'm not a big football fan by any means, but watching the Super Bowl is a tradition for me, and along with watching comes eating a meal of football food!

My traditional Super Bowl snack is usually a dip to eat with tortilla chips.  In the past, I've made an Indian inspired layer dip, my favourite plantain guacamole, and the standard layer dip that usually includes shredded cheese, sour cream, guacamole and salsa.

This year, I wanted to change things up a bit, and I found the perfect inspiration from Two Saucy Sisters blog, who put a unique spin on layer dip by adding a layer of mashed sweet potato.  I loved this idea, but I thought the sweet potato on its own might be a bit plain, so I decided to make a sweet potato hummus to use as one of the layers instead.


The sweet potato hummus came out super thick and creamy and was spiced up a bit with flavourful ingredients like garlic, lemon juice, and notes of cumin, cayenne and smoked paprika. And that's just one layer of this dip!

In addition to the hummus, you add a layer of mashed avocado with lime juice, then some salsa, and finally you top it off with plain yogurt. You can also add a sprinkle of chopped cilantro and a drizzle of sriracha sauce to give the dip even more of a kick.

This is actually really easy to put together, especially if you make the sweet potato layer ahead of time.  I loved how creamy the dip was and the way the layers mixed together when you dug in.  I think a great layer dip is one where each component tastes great on its own, but they come together to make something that tastes even better, and this dip definitely does that!

You can serve this in one larger dish for easier sharing, or divide it up into small cups to make fun individual dip portions, like I did. Just dig your spoon all the way to the bottom to get a bit of everything, and spread onto a tortilla chip - or just enjoy straight from the spoon!

If you're watching the game this Sunday, I hope you have fun cheering on your favourite team and of course cooking and eating lots of good food!  Also, I've set up a new Superbowl tag for some of the recipes on here that I think would make good Super Bowl food (like quesadillas, salsa, dips and fries), so feel free to check that out for more ideas!


Layered Sweet Potato Dip
Adapted from Two Saucy Sisters

*Note: I didn’t include specific amounts here – just use as much of each as you like, as long as you include approximately equal amounts of all four main components (sweet potato hummus, avocado mash, salsa, and plain yogurt or sour cream).

Sweet potato hummus (recipe below)
1 ripe avocado
1 tbsp lime juice
Salt and pepper
Taco seasoning (optional)
Prepared salsa (I used a mango salsa)
Plain yogurt (can substitute sour cream)
Fresh cilantro (optional)
Sriracha (optional)

First, make the sweet potato hummus (see instructions below). 

Next, make the avocado layer: Chop the avocado and place in a bowl. Give it a rough mash, then add the lime juice. Season with as much salt and pepper as you like, and sprinkle with taco seasoning. Continue mashing until smooth.

To serve in individual sized cups: Start by placing a large spoonful of the hummus in the bottom of each cup. Next, add an equal amount of the avocado mash. Top with as much salsa as you like. Finally, add a spoonful or two of plain yogurt or sour cream (Note: I added one more spoonful after taking these photos). Garnish with chopped fresh cilantro and a drizzle of sriracha if desired.

To serve in one container: Layer ingredients in the same order, spreading each one out to fill the container.

Serve with tortilla chips and spoons for scooping.


Makes enough for 4 individual sized cups. You will have lots of sweet potato hummus left over, so if you want to make more cups, just double the amounts for the avocado layer and use more salsa and yogurt.


Sweet Potato Hummus
1/2 lb sweet potato, peeled and cut into chunks
1 cup canned chickpeas, drained and rinsed
1 clove garlic, peeled and chopped
1.5 tbsp tahini
1.5 tbsp fresh lemon juice
1 tbsp olive oil
1/2 tsp cumin
1/4 tsp cayenne
1/4 tsp smoked paprika
1/8 tsp salt

Place sweet potato chunks in a steamer basket and steam, covered, until tender (about 10 minutes). Remove from heat but keep the cooking liquid aside.

Place cooked sweet potato and all remaining ingredients in a food processor and puree until smooth. If the mixture is too thick, add some of the cooking liquid from the sweet potatoes to thin it out (I added 1 tbsp). Taste and add more seasoning if desired.

Transfer hummus to a bowl and keep refrigerated.


January 21, 2013

Paneer & Spinach Quesadillas with Cilantro Chutney


After making my "PLT" sandwiches, I wanted to come up with another use for the rest of my paneer cheese, and my first thought was to use it in quesadillas!

I took my inspiration for these quesadillas from one of my favourite things that I ate when I was in India - parathas.  Parathas are basically an Indian flatbread stuffed with a variety of fillings, from the classic potato (aloo) paratha to more unique combinations like cauliflower and daikon, or onion with mushrooms.

One of my favourite parathas to order used to be paneer with spinach (also known as palak-paneer paratha), cooked until the outside is golden brown and served with spicy green chutney and cool yogurt. Here's a look at my actual order from a paratha restaurant in India:


While I could have attempted to recreate this at home, I decided to try to take the filling ingredients and use them in tortillas shells instead to make these quesadillas!

And since quesadillas are so much better with toppings like salsa and sour cream, I took the typical paratha condiments, cilantro chutney and plain yogurt, and used them to top my quesadillas.


After not having much success with my last attempt to make quesadillas, I was super excited that these turned out the way I wanted! The only caveat is that the paneer doesn't melt easily, so if you want an extra gooey, cheesy filling, just stick the cooked quesadillas in a warm oven or the microwave briefly after you've cooked them. This also works well with any leftovers - I thought they were even better after being reheated!

Since the paneer is rather flavourless on its own, the spinach cooked with onion, chili and ginger helped to spice up the filling.  But what really took these quesadillas over the top taste-wise was the cilantro chutney. While I think that any storebought chutney would still taste great as a condiment here, I was so glad I took the extra effort of making my own.

The chutney was super spicy for my taste (even with only one green chili), but the heat was balanced out by the lemon juice that I added.  Swirling some creamy plain yogurt into the chutney as you spread it on your quesadillas also helped to mellow out the spicy bite!


Paneer & Spinach Quesadillas

~5 cups packed spinach leaves
1 tbsp vegetable oil
1 small yellow onion, diced
2 tsp fresh ginger, minced
1 green chili, minced
1/2 tsp cumin
Dash of salt
~2 cups (200 grams) paneer cheese, grated
6 small whole wheat tortillas
Cilantro chutney (storebought, or recipe below)
Plain yogurt

Wash the spinach and let dry in a colander, squeezing out any excess moisture with your hands.

Heat the vegetable oil in a large saucepan over medium heat. Add the onion, ginger, chili, and cumin and cook, stirring often, until the onion softens (about 4 minutes).  Add the spinach leaves and a dash of salt. Cook until the spinach leaves are wilted and most of the moisture has evaporated, about 6-8 minutes, stirring occasionally. Remove from heat and transfer mixture to a bowl.

To make quesadillas, heat a large non-stick skillet over medium heat. Lay a tortilla in the pan and sprinkle about 1/3 cup of the grated paneer over half of the tortilla.  Top with about 1/4 cup of the spinach mixture. Fold the quesadilla, bring the empty side down over the filling, and press down with a spatula. Once the bottom side is lightly browned (about 2-3 minutes), flip and cook the other side for another couple of minutes.  Remove from pan and transfer to a plate. (If you are making a larger batch, you can transfer the cooked quesadillas to a baking sheet and keep in a warm oven (200°F) while you cook the remaining quesadillas).

Repeat the process until the cheese and spinach mixture are used up – mine made enough for 6 small sized tortillas. Serve warm, with the cilantro chutney and plain yogurt.


Cilantro Chutney
Slightly adapted from Vegan Eats World

2 cups packed cilantro leaves (it’s okay to leave some thin stems in)
1/4 cup unsweetened shredded coconut
3 cloves garlic, peeled and roughly chopped
1 green chili, minced
1 ¼ tsp garam masala
1/2 tsp salt
2 tbsp fresh lemon juice
1/4 cup water (plus more if necessary)

Add all the ingredients except for the water to a food processor or blender. Blend until everything is mixed together.  Add half of the water and blend again. Continue to blend, gradually adding more water as necessary, until the mixture is as smooth as possible (I used 1/4 cup plus 1 tsp water).

Transfer to a small container and store in the fridge.


July 20, 2012

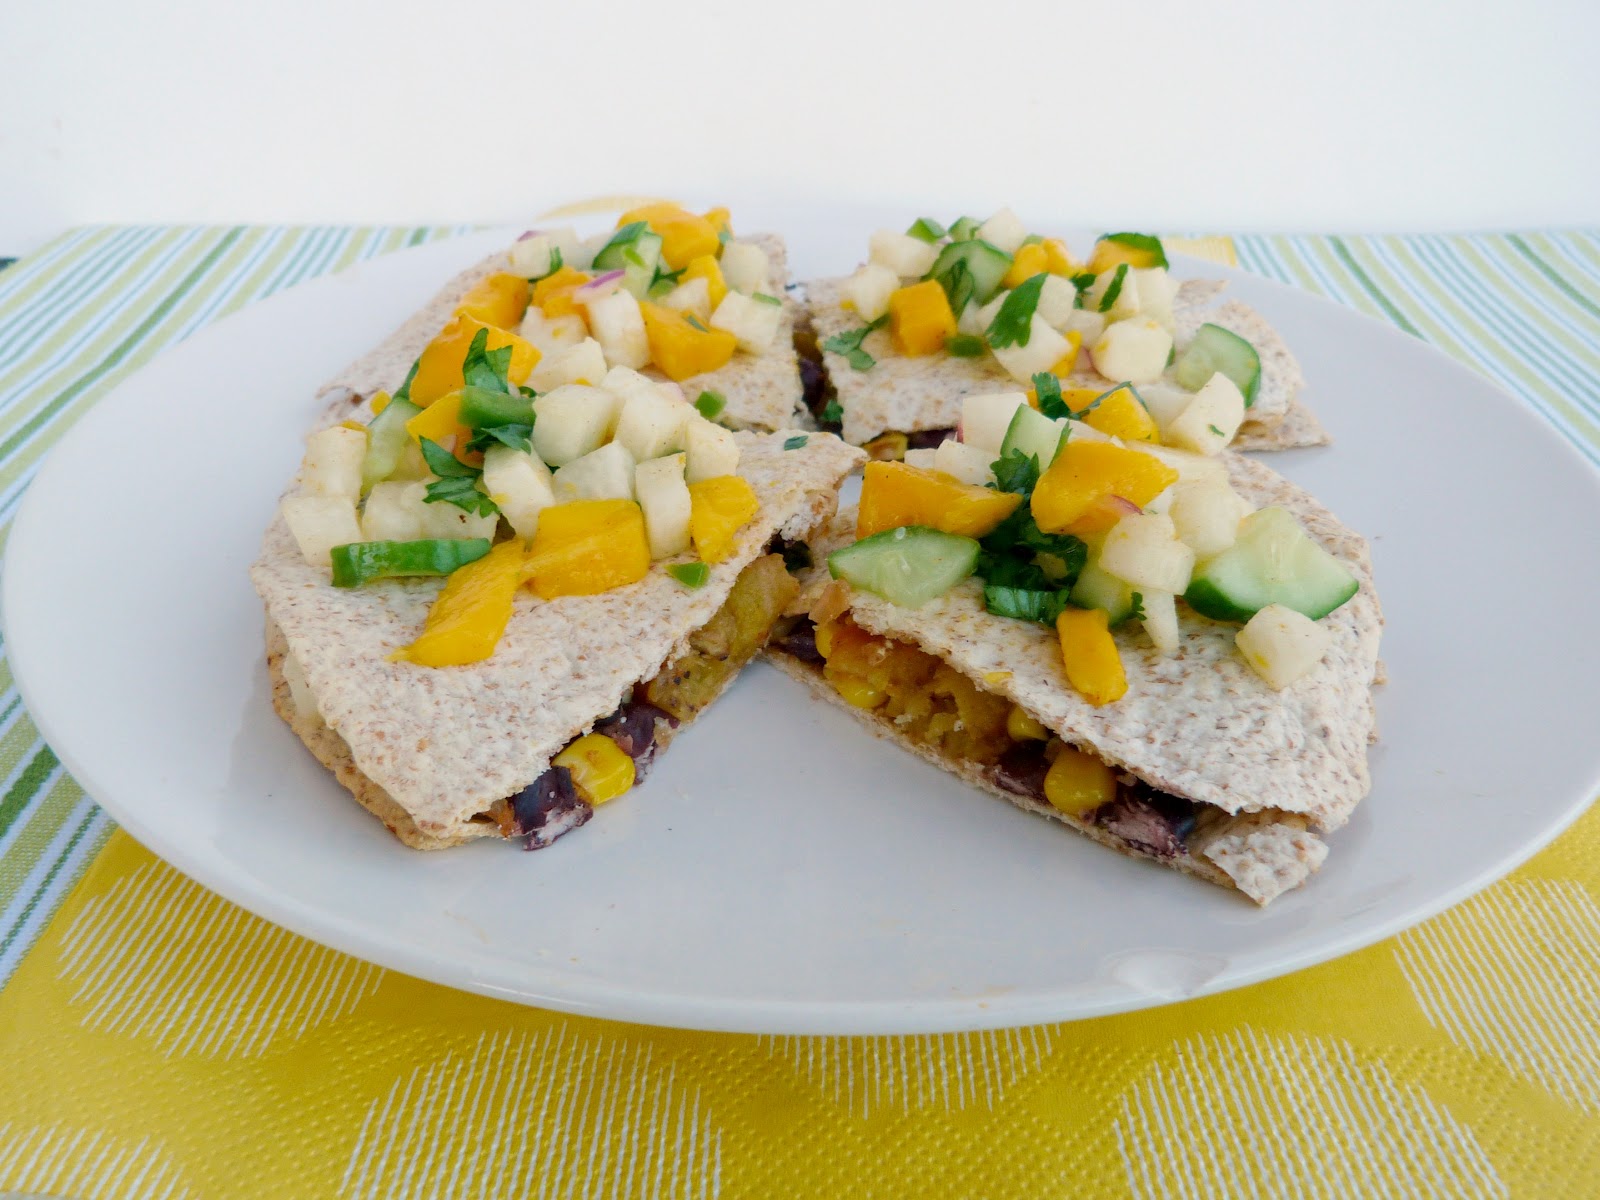
Black Bean, Corn & Plantain Tortillas with Mango Jicama Salsa


As promised, I finally have a new recipe to share! Today's post is actually more like two recipes in one, since each of the components can be made and eaten either separately or together. 

I started out with the intention of making quesadillas filled with a black bean, corn and plantain mixture, and topped with a fresh and fruity salsa. I decided not to add any cheese to the filling because I wanted to keep them light, and I didn't think that cheese would really go with the plantains. 


The preparation part went smoothly, but it wasn't until I had baked them, photographed them, and started eating them that I realized what a crucial mistake I had made....it turns out that a quesadilla really isn't a quesdailla unless it has cheese.  Otherwise, there's nothing to bind everything together and you end up with just two tortillas and a filling that spills out every time you try to take a bite!


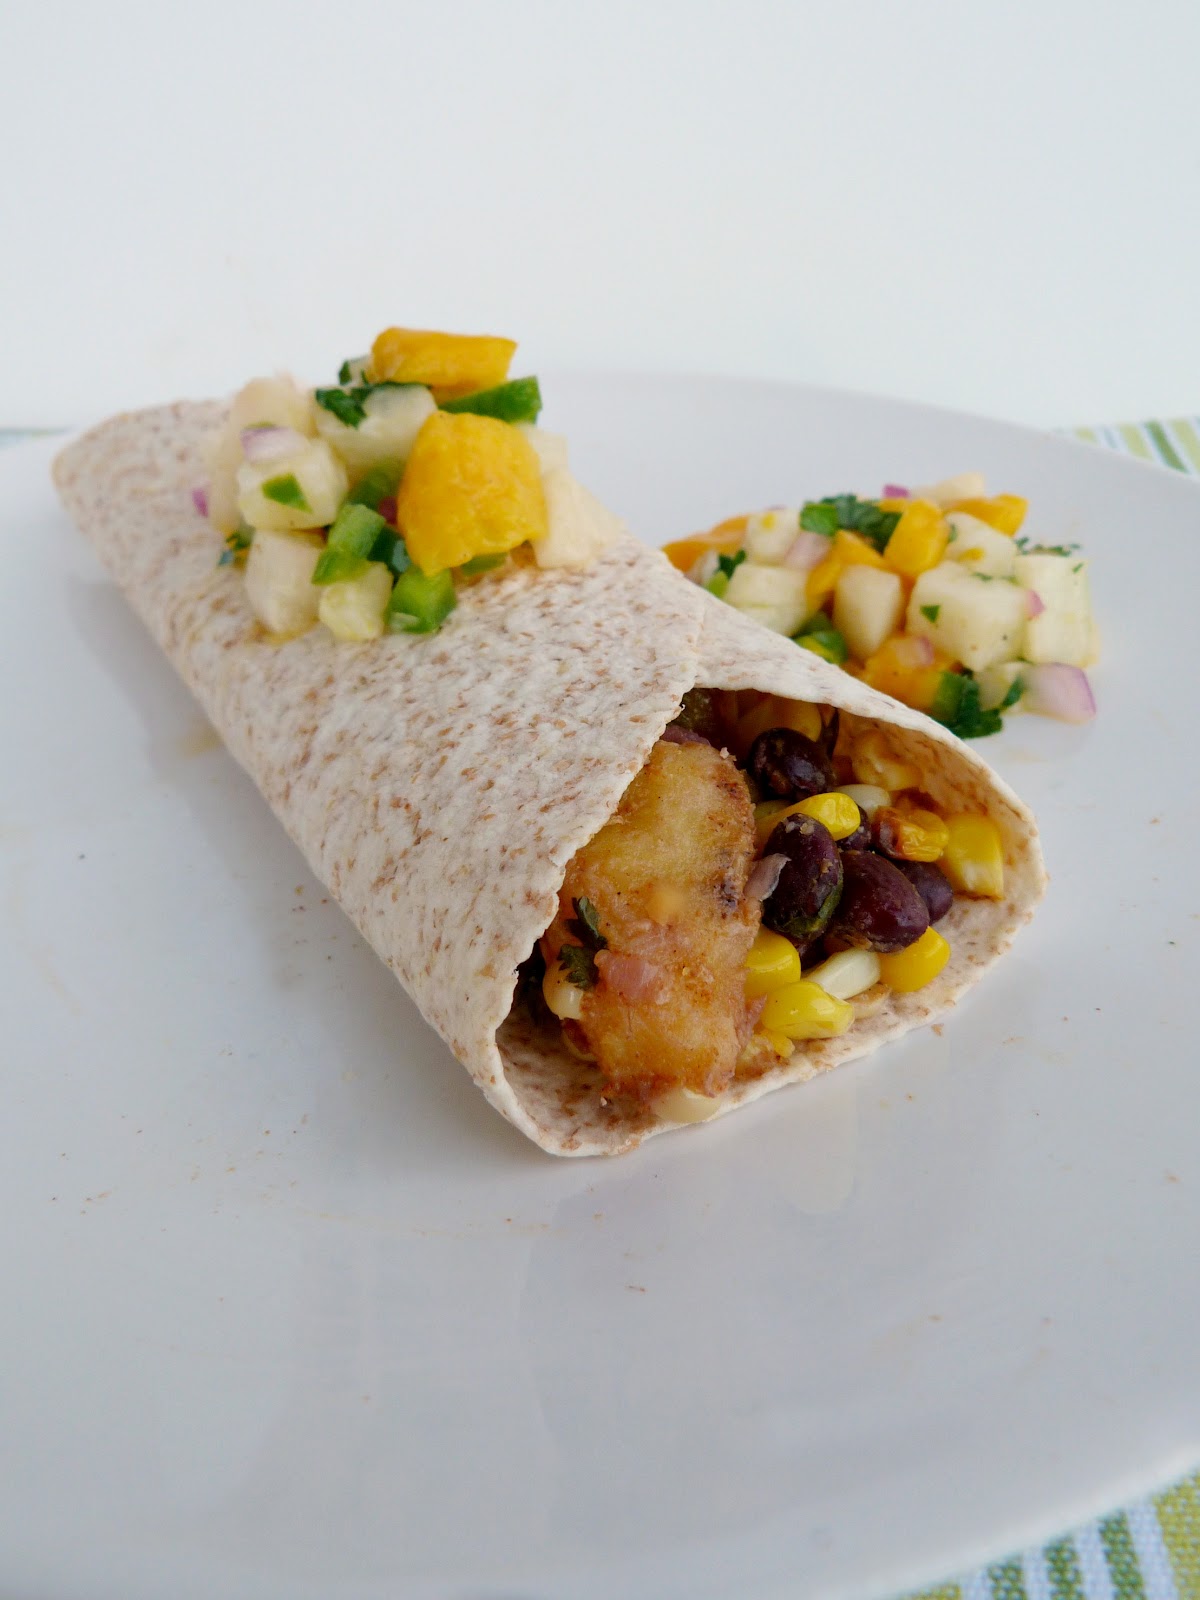
I still loved the taste of my "quesadillas" though, so I wasn't ready to give up on them yet! I repurposed my leftovers and turned them into a simple tortilla wrap instead, which was much easier to eat and just as delicious!

I loved the combination of sweet and spicy flavors in the filling - plantains pair so well with black beans, and the corn added a nice crunchy dimension. Even though there were a lot of ingredients between the filling and the salsa, I thought everything worked really well together! The mango-jicama salsa was so light and refreshing, which was a nice change from the usual sour cream and tomato salsa that is served with Mexican dishes.

I thought this was such a fun and tasty meal for summer, and I like that you can use the components in different ways. For example, I think the salsa would be good on its own with chips, or on top of veggie burgers, chicken or fish.  The filling could also be eaten on its own, or used for tacos, wraps, burritos or quesadillas - just make sure you add some cheese if you want it to stick together!


Black Bean, Corn & Plantain Tortillas with Mango Jicama Salsa

Salsa
1 cup diced jicama
1 small mango, diced (about 1/2 cup)
1/4 cup diced cucumber
2 tbsp finely chopped red onion
1/2 a jalapeno, minced
Juice of half a lime
2 tbsp chopped cilantro
Salt and chili powder to taste

Tortillas
1 tbsp vegetable oil
1/2 a small red onion, diced
1 ripe plantain (yellow with black spots), peeled and chopped
1 ear of corn, kernels removed
1 garlic clove, minced
1/2 a jalapeno, minced
1/2 can (1 cup) black beans, rinsed and drained
Juice of half a lime
1 tsp chili powder
1/2 tsp cumin
1/4 tsp ground coriander
1/4 tsp salt
1/4 cup chopped cilantro
shredded cheese (optional - I left it out)
6 small whole wheat or corn tortillas

To make salsa:
Place the jicama, mango, cucumber, red onion and jalapeno in a small bowl and toss to combine. Add the lime juice and cilantro and stir. Sprinkle with salt and chili powder to taste.  Refrigerate until serving time.

To make filling:
Heat the vegetable oil in a large skillet over medium heat.  Add the onion, plantain and corn kernels and sauté, stirring occasionally, for about 8 minutes (until the plantain has softened and starting to brown).  Add the garlic and jalapeno and cook for 30-60 seconds, stirring.  Stir in the black beans, lime juice, chili powder, cumin, coriander and salt. Reduce heat to medium-low and cook until the beans are heated through. Stir in the cilantro and remove from heat.

Oven option for quesadillas:
Preheat oven to 350°F.

Lay out three tortillas on a baking sheet. Divide the filling mixture on top of each of the three tortillas and sprinkle shredded cheese on top if desired. Press the remaining three tortillas over top of the filling for each quesadilla.

Place quesadillas in the preheated oven and cook for about 15 minutes, until the tortillas are starting to turn crisp and golden.

Remove from oven and slice into wedges.

Serve with jicama salsa.

Tortilla option for wraps:
Lay out three to four tortilla shells (you may want to warm them in the microwave first). Divide filling mixture on top of each tortillas. Top with a couple spoonfuls of the salsa. Roll up each tortilla to make a wrap. Serve with extra salsa on the side.  

Makes 3-4 tortillas (you may have extra salsa leftover).

This was submitted to the Healthy Vegan Fridays blog hop.

April 08, 2012

Rosemary Grape Focaccia


Happy Easter to everyone who is celebrating it today!  We will be having our family Easter dinner tonight, and I'll be contributing a vegetarian entree for my sisters and I to eat instead of ham.  I chose a new recipe from Vegan Planet for a couscous cake topped with a spring vegetable saute - I hope it turns out as good as it sounds!

Unfortunately, I didn't have time to come up with an Easter themed recipe for my blog this year, but I still have a tasty recipe for you today...and I also have a few recipes inspired by my Singapore/Thailand trip coming up next!

When I first tried roasted grapes in this quinoa salad, I started thinking of more ways that I could use them.  Then Heather of Sunday Morning Banana Pancakes gave me a great suggestion when she said she makes a focaccia with roasted grapes and rosemary. I couldn't get this idea out of my head, so I knew I had to try it myself as soon as I could!

I had always thought that focaccia required some kind of special dough, but when I looked for recipes to follow, I found out that you can just use any regular pizza dough.  So I turned to my trusty Vegan Planet once again to get a recipe for traditional pizza dough, although I changed the flours so that my dough was made with half whole spelt and half light spelt. This resulted in a slightly darker focaccia than you would usually see, but at least it was a bit more nutritious!


Once you have the dough prepared, the focaccia itself is pretty easy to make.  I just tossed some sliced shallots with garlic, olive oil and dried rosemary (since I didn't have fresh), and spread that over top of the dough. Next, I took my grapes and pressed them down into the dough.  Then it goes into the oven to bake, and when it's done you can sprinkle some coarse salt on top like a traditional focaccia.

This was a simple combination of ingredients that worked really well together! Even though there was no sauce and the toppings were minimal, they still provided a lot of flavour and I loved the combination of the sweet juicy grapes with the savory shallot-rosemary mixture.

I think this would make a great appetizer if you cut the focaccia into smaller pieces, but it also made a great lunch for me on its own!


Rosemary Grape Focaccia
Inspired by Sunday Morning Banana Pancakes and adapted from Vegan Planet and various other sources

1 recipe of your favourite vegan pizza dough (I used the Traditional Pizza Dough from Vegan Planet made with half whole and half light spelt flour)
2 small shallots
2 small cloves of garlic, minced
2 tbsp olive oil
1 tbsp dried rosemary (can substitute fresh rosemary)
1 cup red grapes

Preheat oven to 400°. Spray a baking sheet with cooking spray and sprinkle with cornmeal.

Roll out the dough to a 9x13 inch rectangle (about ½ inch thick).

Peel the shallots and cut in half lengthwise, then slice thinly. Place sliced shallots in a bowl along with the minced garlic and olive oil. Stir to combine, then add the rosemary and stir again.

Spread the shallot mixture over the dough, pressing down gently. Distribute the grapes evenly on top of the shallot mixture and press each one down into the dough.

Place in the preheated oven and bake for 25-30 minutes, until dough is golden and shallots are browned.

Remove from oven and sprinkle with coarse salt if desired.

Makes about 6 servings/pieces. (Note: I made half the recipe for a smaller 3-piece focaccia, as shown in the pictures) 

February 02, 2012

Sweet Potato Chili Fries


Every year around this time, recipes for chili start popping up everywhere in magazines and blogs. Chili has never been part of my family's Super Bowl tradition, but it seems to be a popular game day choice for a lot of other people!

Since there are already so many recipes for vegetarian chili out there, I didn't want to add another one here...but instead, what I can offer you is an idea for a fun way to use up your leftover chili - these sweet potato chili fries!

The concept of chili fries had never particularly appealed to me until last year, when I decided to make this recipe for vegetarian chili with fries from my Canadian Living: Vegetarian Collection cookbook.  I liked it so much that I couldn't wait to make it again the next time I had leftover chili!

This time, instead of serving the chili over regular potatoes, I tried it with sweet potatoes because I love sweet potato fries....and now I can say that I love eating sweet potato fries with chili even more!

You can use any vegetarian chili recipe here (although I wouldn't recommend a sweet potato chili since you'll already have the sweet potato fries). Then all you need to do is bake your fries in the oven, heat up your leftover chili and serve with any additional toppings you like - I used sour cream and shredded cheese, but you can leave these out for a vegan version (or use vegan substitutes).


Sweet Potato Chili Fries
Adapted from Canadian Living

1 large sweet potato
olive oil
Tex-mex seasoning
2 servings of leftover vegetarian chili*


Scrub the sweet potato (I left the skin on). Cut in half lengthwise, then slice each half into thick wedges.  Toss with a bit of olive oil and season with tex-mex spices (I used a pre-made spice blend, but regular chili powder would work too).

Place fries on a baking sheet and bake in the oven at 425° for 25-30 minutes, flipping halfway.

Transfer fries to a plate and top with reheated chili. Garnish with sour cream, shredded cheese, and green onions if desired.


Makes 2 servings.


*For the chili, I used this recipe, with the following changes:
- left out the celery and increased the amount of onion and carrot to at least 1/2 cup each
- used smoked paprika and increased the amount of chili powder by an additional tsp
- added a small minced jalapeno
- used mixed beans (although next time I would stick with just kidney beans)

Other Vegetarian Chili Recipes from Around the Web:
Vegetarian Chili with Bulgur Wheat from A Couple Cooks
Fiery Red Bean Chili with Farro from Jeanette's Healthy Living
Vegetarian Quinoa Chili from Food Doodles
Chipotle & Chocolate Chili from Would Would Cathy Eat
Vegetarian Chili with Peanut Butter from Branny Boils Over
Vegetarian Green Chili from Pink Parsley
Pumpkin Chili from The Taste Space
Pumpkin Chili Mole from Florida Coastal Cooking


January 31, 2012

Indian Six-Layer Dip


Since Super Bowl recipes seem to be pretty popular right now, I thought I would follow up my last post with another appetizer that would be a great addition to any game day party menu.

In my last post, I shared a recipe for an appetizer that I'd never made before, but it turned out amazing!  Today I'm sharing a recipe that I've already made many times before, so I know it's good!

This Indian-inspired dip is based on the idea of a traditional layered dip, but it becomes much more interesting by adding some Indian flavours and ingredients that you wouldn't normally think to put in a dip!

The bottom layer is a combination of curry powder and sour cream, which is topped with a layer of shredded cheese, then a mixture of yogurt and mango chutney, and finished off with a generous sprinkling of coconut flakes, peanuts and cilantro.  All of the layers come together to make a delicious dip that combines sweet and spicy, creamy and crunchy, all in one bite!

I like to serve this with toasted pappadums (a thin crispy Indian wafer), but if you can't find any, then it would also go well with pita chips or plain tortilla chips.

So if you want to change up your traditional chips and dip this year, I hope you'll give this recipe a try!


Indian Six-Layer Dip
Adapted from The Monterey County Herald

1/4 cup light sour cream
1 tsp curry powder
1/4 cup shredded marble cheese
1/4 cup low-fat plain yogurt
2 tbsp mango chutney
2 tbsp unsweetened coconut flakes (or shredded coconut)
2 tbsp chopped fresh cilantro
2 tbsp chopped roasted peanuts
pappadums, pita chips or tortilla chips for serving

In a small bowl, mix the sour cream and curry powder, stirring well until the curry powder is completely incorporated. Transfer to the bottom of your serving dish, spreading evenly. Top with shredded cheese.

In a separate bowl, mix the yogurt and mango chutney together. Pour over the cheese, spreading evenly across the top of the dish. If you are making this ahead of time, stop here and refigerate the dip before adding the remaining toppings (otherwise they will get soggy).

When you are ready to serve,sprinkle the coconut, cilantro, and peanuts over top of the dip, making sure each component is evenly distributed.


Serves 2-3 as an appetizer, or one person as a meal (which I like to do!).  If you are making this for a party, you will want to double or triple the recipe.


On a different note, I wanted to share an update on the 2011 Ninjamatics Canadian Weblog Awards....I mentioned a couple of weeks ago that my blog was included in the top five nominations for Best New Weblog and Best Weblog About Food and Drink.

Well, the team at Ninjamatics has been working hard since then to choose the final winners, and I was super excited to learn this morning that Vanilla & Spice was awarded second place in both categories!!

2011 Canadian Weblog Awards winners

I still can't quite believe that I even made it to the top five, let alone being chosen as one of the winners.  There are so many wonderful Canadian food blogs out there, so I'm very grateful to have my blog acknowledged this way!

I just wanted to say thank you to Ninjamatics and the team of jurors, and congratulations to the other winners and nominees.  Be sure to check out the other two food blogs who won first and third place in the Food & Drink category - Crumb and Cookin' Canuck!


January 27, 2012

Plantain Guacamole in Black Bean Cups


With Super Bowl Sunday coming up next weekend, its the perfect time to share a fun party appetizer recipe to add to your game day menu!

To be honest, I'm not really a football fan, but I do look forward to the Super Bowl every year. It's fun to choose my favourite team (usually based on uniform colours) and to watch the entertainment and big-budget commercials (although sadly we never get to see the best commercials up here in Canada).

And of course, I look forward to Super Bowl food! I love sitting around the coffee table in front of the TV eating a meal made up entirely of finger foods, chips and dip.

Guacamole is one of the things that has always made an appearance in our family's Super Bowl meal, but this year I wanted to try something a bit different with my guacamole. I had seen these guacamole-stuffed black bean cups on the blog Cake, Batter & Bowl a long time ago but I'd never gotten around to making them, so I decided that now was the perfect opportunity to try them!


I've also had plantains on my mind lately, so I knew I wanted to try incorporate them somehow.  First, I decided to make some sauteed plantains to top each cup with....and then I thought why not mix them into the guacamole too? I've tried mango guacamole in the past, so I figured another tropical fruit would also taste just as good...and did it ever!

I don't like making strong statements like "this was the best guacamole ever", but it turned out even better than I expected! It was so creamy and I loved the way the sweetness of the plantains paired with the lime and avocado - just make sure you get a ripe enough plantain. otherwise it won't mash easily and the flavour won't be as pronounced.. Then the other ingredients like the cilantro, garlic and jalapeno helped to balance out the other flavours and added just a bit of heat to the guacamole.


What I loved most about this whole appetizer was that each of the components was so good on its own, but eating them all together made each part taste even better! The black bean cups were the perfect little vessel to hold the guacamole, and this way everyone can just pick up a portable cup instead of the usual chip-and-dip method.

The recipe might look a bit long, but each of the components is easy and quick to make.  You can even make the black bean cups earlier in the day and then assemble everything right before you want to eat. I think these will definitely earn a permanent spot on my Super Bowl menu from now on!


Plantain Guacamole
2 very ripe avocados
1 very ripe plantain (yellow with black spots)
1 small-medium jalapeno,finely minced
1-2 garlic cloves, minced
1/4 cup chopped cilantro
Juice of 2 limes
1/2 tsp kosher salt
Ground pepper to taste

Peel and dice the avocados and place in a bowl. Peel or slice the the skin off the plantain, then cut into small pieces and add to the bowl with the avocados. Mash the avocados and plantain together until creamy (a few chunks are okay). 

Add the remaining ingredients to the bowl and mix thoroughly. Cover and refrigerate until serving time.


Sauteed Plantains
1 ripe plantain (yellow with a bit of green is okay)
Dash of chili powder and cumin
Water
1 tbsp olive oil

Peel the plantain and cut into round slices (you will need at least 12 slices). Place slices in a bowl and sprinkle with chili powder and cumin. Add a couple drops of water to help the spices stick, tossing to coat.

Heat olive oil in a skillet over medium heat. Add the plantains and cook for 5-6 minutes, flipping once, until browned. Remove and drain on paper towels.


Black Bean Cups
Adapted from Cake, Batter & Bowl

1 can (1.5 cups) black beans, rinsed and drained
1/2 cup whole wheat flour
1 tsp cumin
1/2 tsp smoked paprika

1/4 tsp cayenne
1/2 tsp kosher salt
2 tbsp olive oil

Preheat oven to 350ºF and spray a 24 cup mini-muffin pan (or two 12-cup pans) with cooking spray.


Place the black beans, flour, cumin, paprika and salt in a large food processor and pulse a few times to mix. Then keep the processor running while you slowly drizzle in the olive oil. Process until the mixture comes together into a smooth, sticky dough. 

Divide the dough evenly into the muffin cups and press with your fingers to form cups that spread up the sides of each muffin cup. 

Bake in the preheated oven for 15-20 minutes, until the cups are set. Remove from oven and cool completely on a wire rack.


To assemble:
Fill each black bean cup with a large spoonful of the guacamole. Cut the larger sauteed plantain slices in half and top each guacamole cup with one of the half-slices (you can keep the smaller slices whole).


Note: Leftovers won't save very well the next day, but I doubt you'll have any leftovers anyway! If you end up with extra plantains or guacamole after assembling the cups, you can just eat them on their own without the black bean cups. 

This was submitted to Ricki's Wellness Weekend at Diet, Dessert & Dogs

October 14, 2011

Hummus Kale Chips


I realize that kale chips have been all over the web for quite a while now, so you might not need another recipe for them.  But for those of you who either haven't tried kale chips yet, or have tried them but didn't like them, this version might change your mind!

I admit it took me a long time before I was willing to try kale chips...even though I had seen many positive reviews from other bloggers who claimed they tasted great and were a healthier alternative to potato chips, I was still skeptical - especially after my sister tried them and hated them!

But then once I started using nutritional yeast more often and realized how yummy it can make things, I figured that if the kale chips were coated in a cheesy nutritional yeast topping, they were sure to be delicious!

Somewhere along the way of looking for recipes for cheesy kale chips, I came across one that also used hummus and I thought that was a brilliant idea! (Unfortunately, I didn't bookmark the recipe but I'm pretty sure it was this recipe for Chipotle Hummus Kale Chips)

So after mixing up my dressing with hummus, nutritional yeast and a couple of other ingredients, I put my kale chips in the oven and waited anxiously...and once I tasted my first kale chip, I was hooked! The flavour was similar to nacho chips, and the kale was so light and crispy. I especially liked the pieces that had an extra-thick coating on them!

I'm happy to say I'm no longer a skeptic when it comes to kale chips! I've made them multiple times now, trying out some different topping ideas, but this recipe is still my favourite!


Hummus Kale Chips
Inspired by various sources, such as The Novice Chef Blog and I'm Not Superhuman

About 2 cups chopped kale (from 1-2 stalks)
1 tbsp hummus (any flavor)
1 tsp olive oil
1 tsp lemon juice
1 tsp nutritional yeast
1/4 tsp paprika
salt and pepper

Preheat oven to 350°F.

Remove the stems from the kale and slice the leaves into pieces. Place the leaves in a large bowl.

Mix the remaining ingredients in a small bowl until smooth. Taste and adjust seasonings if desired.

Pour dressing over kale and massage into the leaves with your fingers until the kale is evenly coated. (This gets a bit messy, but I find it works better than mixing the dressing in with a spoon)

Spread kale in a single layer on a baking sheet. Bake for about 15 minutes, until crisp.

Makes 1 serving.

September 30, 2011

Chickpea Fries


Before I get to this recipe, I just wanted to give you all a head's up for next week - since Canadian Thansgiving is coming up very soon (next weekend!), my sister Natalie (from Once Upon a Cutting Board) and I both decided to dedicate our blogs to Thanksgiving all week! So be sure to keep visiting so that you can get new recipes every day leading up to Thanksgiving, starting this Sunday!

Now on to these chickpea fries...I'm pretty excited to share this recipe today because it's one of my favourite recipes out of all the cookbooks I own. It comes from Canadian Living: The Vegetarian Collection, and with a title that I didn't understand ("Chickpea Panisse") and no picture to go along with it, I'm surprised that I didn't just pass over the recipe when I first read through the cookbook. But now I'm so glad that I gave it a try, and it has become one of the few recipes that I've actually made multiple times.

The only downside of the recipe is that you have to stir the batter constantly for about 10 minutes while cooking, so your arms will be very sore by the time you're done! But I try to tell myself that not only is the end result worth the work, but I also managed to fit in a workout while making it!

Other than the constant stirring, these are actually pretty easy to make and require very few ingredients - they're basically just made of chickpea flour. I also try to "fry" these in as little oil as possible, to keep them fairly healthy.

If you haven't heard of chickpea flour (also called besan, gram flour or garbanzo flour) you can find it at bulk food stores (I buy it from Bulk Barn), at natural foods stores, Indian markets and even in many grocery stores  - check the organic or gluten-free section.

Chickpea flour has a slightly nutty taste, since it's made from ground chickpeas. I love the taste so much that I could eat these fries plain, but they are made even better when covered in salt and pepper. I also like to dip them in spicy ketchup (pictured above), which I make by mixing regular ketchup with some chili powder and a bit of curry paste. If you like mayonnaise-based dips, you could also eat these with a curried mayo dip (which is what the cookbook suggests).


Chickpea Fries
Adapted from Canadian Living: The Vegetarian Collection

1 cup water
2-3 tbsp olive oil, divided
pinch of salt
1/2 cup + 1 tbsp chickpea flour

Heat the water, 1 tbsp of the olive oil, and a pinch of salt in a small saucepan over high heat. Heat until the water is hot but not quite simmering.

Reduce heat to medium. Whisk in the chickpea flour slowly. Continue to whisk constantly for 2 minutes, then switch to a wooden spoon and cook for 8-10 more minutes, stirring constantly. Scrape down the sides of the saucepan occasionally as you stir. The batter will gradually get thicker and will start to pull away from the sides of the pan and clump together. Once it is very thick and can hold its shape, remove the pan from the heat.

Scrape the batter into a greased square cake pan or loaf pan (try to work quickly as the batter will begin to set almost immediately). Smooth the top with a spatula. Let the mixture cool for about an hour, until it is completely set.

Once cooled, invert the pan onto a cutting board. Cut the batter into 1/3 inch wide sticks (like french fries).

Heat the remaining oil in a large skillet over medium-high heat. Add the sticks to the pan and fry for about 5-6 minutes, flipping over halfway through, until they are crisp and golden. (The amount here will fit into one skillet, but if you are making a larger amount, you will need to cook them in batches, keeping the finished fries warm while you cook the rest).

Transfer onto a paper towel to remove any extra oil. Serve with lots of additional salt and pepper, and ketchup or another dipping sauce if desired.


Makes 1 serving.

Note: This recipe makes the amount shown above, which is perfect for me as a light meal. It could also serve 2 as a side dish, or you could easily increase the recipe amounts to serve more people.

These would also make a great side dish to serve with these beet-chickpea sliders, or these spinach tofu patties!

LinkWithin

Related Posts Plugin for WordPress, Blogger...