Showing posts with label carrots. Show all posts

March 25, 2014

Roasted Beet, Carrot & Lentil Salad


Does anyone else feel like time is going by super quickly lately? I can't believe it's already near the end of March and I've only managed to write two blog posts this month!

Between schoolwork, spending time with family and friends, and going to classes at the gym, I've been keeping pretty busy and focusing less on developing new recipes. Instead, I've been trying more recipes from cookbooks or other blogs, and throwing together quick and easy meals using whatever I have in the fridge and pantry.

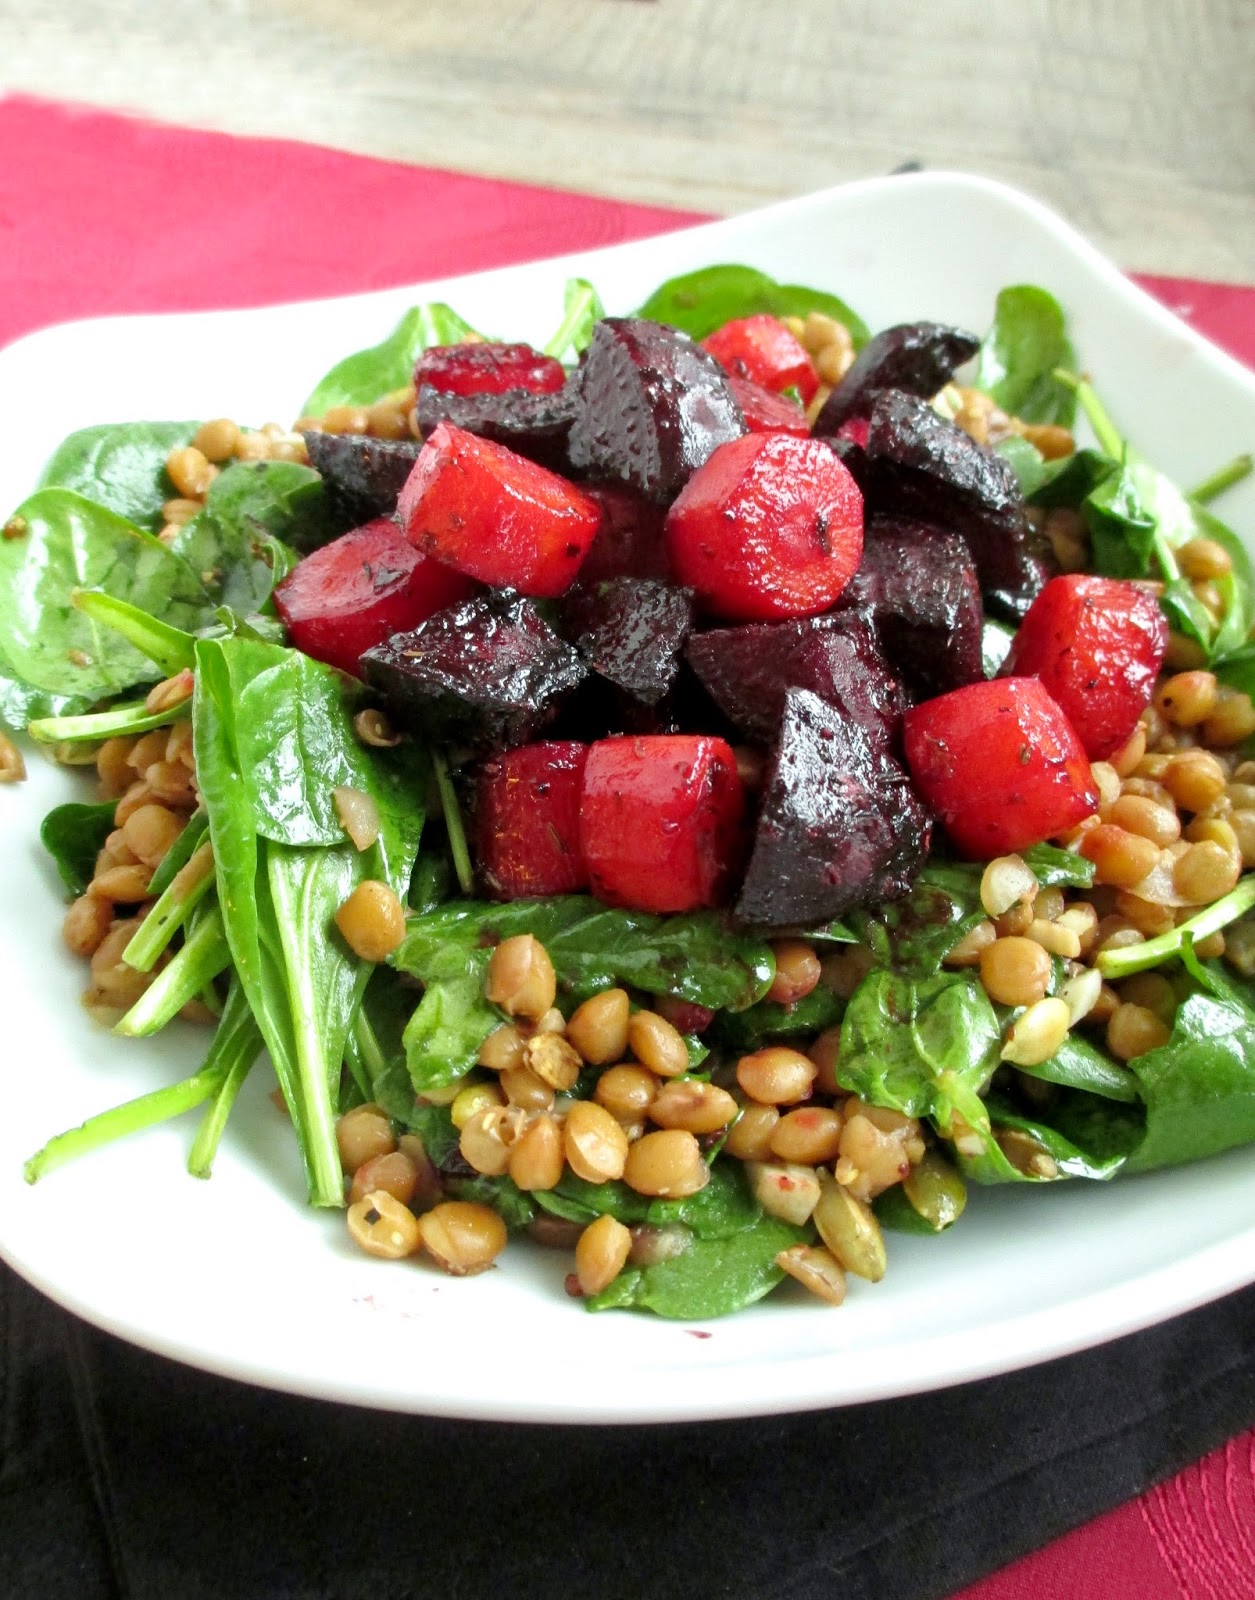
Last week, I picked up a can of lentils thinking I could just use them for another easy, throw-together meal. Taking a look at what I had in the fridge to use up though, I got a bit more inspired and came up with this delicious warm lentil and spinach salad topped with roasted beets and carrots.


The base of the salad was still pretty simple - just saute a bit of garlic, add a can of lentils to the pan to warm them up, and add in some baby spinach leaves so that they get slightly wilted. A sprinkle of toasted pumpkin seeds adds a bit of crunch, and a balsamic dressing brings it all together.

For the topping, I roasted some chopped beets and carrots with a bit of dried herbs, and then made a glaze with balsamic vinegar and maple syrup so the roasted veggies end up with a nice sweet and tangy caramelized coating.

This turned out to be one of those meals that seems simple and rustic, but with special touches that make it more memorable, like the boost of flavour from the balsamic vinegar and the sweet candy-like beets and carrots.

I always love warm salads like this one, but I'm excited to start eating more warm-weather meals with fresh veggies too (if the weather ever does warm up that is)!


Roasted Beet, Carrot & Lentil Salad
Partly adapted from Barbara Cooks

For the roasted veggies:
3 small beets, peeled and diced (about 1-1.5 cups)
2 large carrots, peeled and diced
1 tsp olive oil
1 tsp dried herbs (I used a mix of dried parsley and thyme)
Salt and pepper
2 tbsp balsamic vinegar
1 tbsp pure maple syrup

For the salad:
2 tbsp pumpkin seeds
1/2 tsp olive oil
2 cloves garlic, peeled and minced
1 can lentils, drained and rinsed
~3 cups (packed) baby spinach leaves

Dressing:
2 tbsp balsamic vinegar
2 tsp pure maple syrup
1 tsp Dijon mustard
1 tbsp olive oil
Salt and pepper


Preheat oven to 425°F and line a baking sheet with aluminum foil. Toss the beets and carrots with 1 tsp olive oil, the herbs, and some salt and pepper, then place on the foil-lined baking sheet in a single layer. Roast in the preheated oven for 25-30 minutes, tossing once halfway through.

Meanwhile, start preparing the salad: Heat a large skillet over medium heat. Add the pumpkin seeds and toast for a few minutes, until they start to pop. Transfer pumpkin seeds to a small bowl. Add olive oil to the pan, then add the garlic and sauté for about 30 seconds, until it starts to brown. Add the lentils to the pan, season with salt and pepper, and reduce the heat to medium-low. Let cook for a few minutes, stirring often, until the lentils are heated through. Transfer lentils to a large bowl and add the toasted pumpkin seeds and the spinach leaves.

You can keep the pan heated on the stovetop because you will use it to glaze the veggies. When the beets and carrots are done cooking, add them to the pan over medium heat with the balsamic vinegar and maple syrup. Let cook, stirring often, until the liquid is almost gone. Remove from heat.

Prepare the dressing by whisking all ingredients together in a small bowl. Pour dressing over the lentil-spinach mixture in the bowl and toss to mix. Divide salad onto plates and top with the glazed beets and carrots. Season with additional salt and pepper if desired.  Serve warm.

Makes 2 main servings, or more as a side dish

June 19, 2013

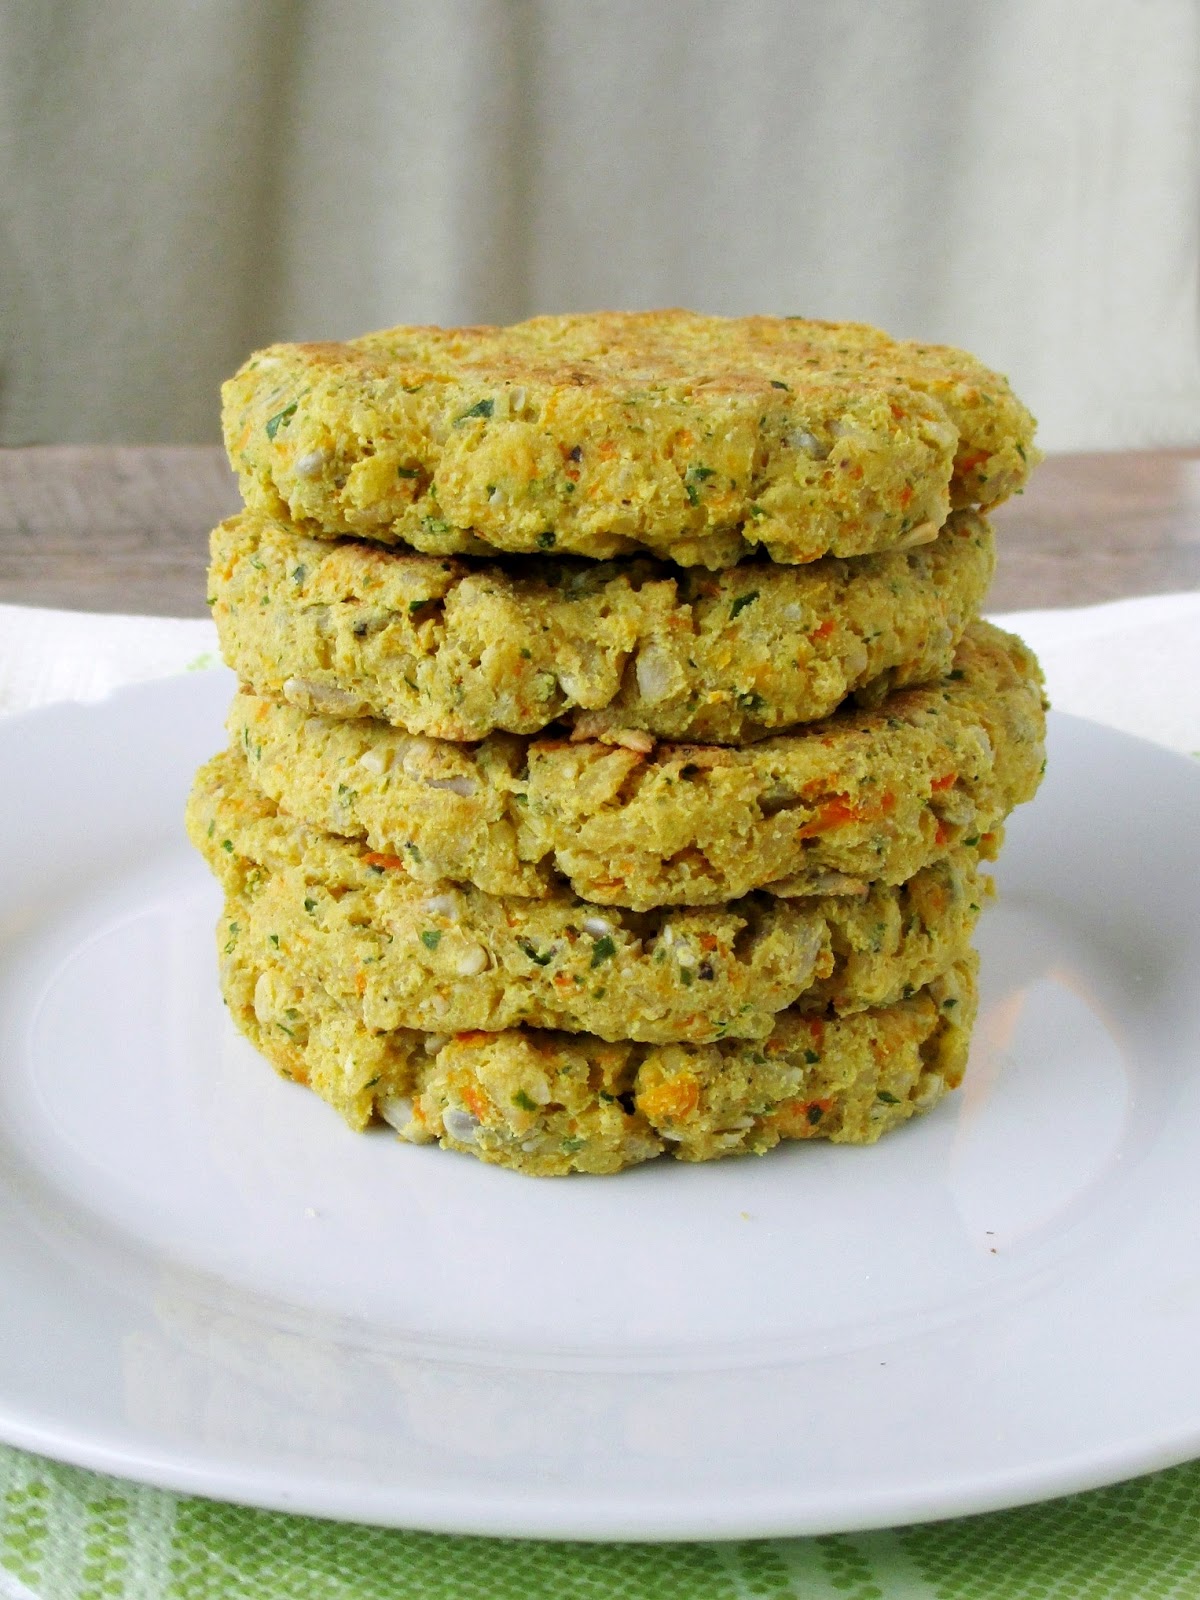
Tofu Sunshine Burgers


I hear a lot in the blogosphere about the quest for "the perfect veggie burger". It seems like standards are much higher for veggie burgers than regular beef or turkey burgers - they have to have the perfect texture (firm with a bit of crunch to them), hold together well, and have lots of flavour.

I guess I would have to say that while I've made lots of different kinds of veggie burgers, I'm still on my quest for one that meets those high standards! Usually my veggie burgers get good marks on flavour, but they barely pass on the texture and holding together well tests. Somehow I always seem to end up with burgers that taste good but are a bit on the mushy side and crumble easily.

Luckily, I've figured out a couple of tricks to improve on those two veggie burger flaws, and my latest attempt - these tofu sunshine burgers - have both great texture and hold together really well!


For the texture issue, I've discovered that brown rice makes a great addition to veggie burgers to add bits of chewiness throughout.  The first time I tried using brown rice in a patty was when I made The Vegan Chickpea's Sunshine Burgers.  I loved how crunchy they were from the rice and sunflower seeds, so I used her recipe as a guide for these burgers.

I combined that recipe with one from Canadian Living for carrot, tahini and tofu burgers. A lot of veggie burgers use an egg to bind the ingredients, but in this vegan recipe, the thick tahini and blended tofu help to act as glue to hold everything together, making for a firm burger that's more similar to a storebought patty than the crumbly, mushy homemade ones that I'm used to.

And last but not least, these veggie burgers also have lots of flavour! The spices really come through, especially the curry powder, and the parsley, garlic and tahini add a Mediterranean flair. These work well on a bun or in a pita with lettuce and a creamy spread like hummus, tzatziki, or a tahini-yogurt sauce (which is what I made for mine, shown in the photos).

And if you want even more veggie burger inspiration, Courtney from The Fig Tree recently did a round-up of 25 veggie burger recipes, so you can find some more ideas on her list!  I've already tried out one of the methods of wrapping the burger in lettuce leaves instead of using a bun with my leftovers of these burgers - a fresh and tasty way to eat them!


Tofu Sunshine Burgers
Adapted from Canadian Living and The Vegan Chickpea

1/4 cup dry brown rice
1/2 tbsp olive oil
1 large clove garlic, minced
1/4 cup shredded carrot
1/4 tsp cumin
Dash of cayenne
175g firm tofu (Soyganic sells a package this size, or just use half of a regular sized package)
1.5 tbsp tahini
2 tbsp packed chopped parsley
1 tbsp lemon juice
1/4 tsp salt
Ground pepper
1/2 tsp curry powder (optional)
2 tbsp raw sunflower seeds


Preheat oven to 400°F and spray a baking sheet with cooking spray.

Cook rice according to package directions. Set aside.

Meanwhile, heat the olive oil in a small skillet over medium heat. Add the garlic and cook for 30 seconds, stirring. Add the carrot, cumin, and cayenne and cook for another 1-2 minutes, stirring often. Remove from heat and set aside.

Drain the tofu and place in the bowl of a food processor. Add tahini, parsley, lemon juice, salt, pepper, and curry powder (if using). Process just until everything is mixed together. Add the carrot mixture and sunflower seeds and process again briefly. Add the cooked rice and pulse a few times until the rice is mixed in.

Form mixture into five equal patties, pressing down so that they are evenly flat. Place on prepared baking sheet and bake in preheated oven for 20 minutes, flipping once halfway through, until lightly browned and firm on the outside.

Serve warm, with buns, pitas, or lettuce wraps and desired toppings (e.g. hummus, tzatziki, lettuce, cucumber, tomato, sprouts).

Makes 5 patties.

March 13, 2013

Hummus Coated Carrot and Parsnip Fries


Today's post is a quick one with a simple idea for eating your veggies in a fun way!  If you love sweet potato fries, and if you also love roasted root veggies, then I think you'll be a fan of this recipe!

I've tried making Angela's popular nut butter coated parsnip fries in the past, but something went wrong and they just didn't turn out as good as I was expecting.  I wanted to give parsnip fries another chance though, and now that I've discovered hummus-coated fries, I've found a new way to make tasty and easy parsnip fries in the oven.

I got the idea for these fries after seeing this recipe for tahini carrot fries on Glow Kitchen. I figured if you can use tahini to cover carrot fries, why not use hummus? And since I couldn't decide between making carrot or parsnip fries, I decided to make both!


All you need to do to make these fries is take your favourite flavour of hummus, mix it with a bit of olive oil, and toss strips of carrots and parsnips in the mixture until they are well coated.  Then bake in the oven for about half an hour, and you end up with tender, browned veggies that you can either eat on their own or dipped in ketchup.

I loved how roasting the veggies brought out their natural sweetness, and the hummus added a hint of spicy, nutty flavour. The hummus also dried out a bit in the oven and started to turn into flakes - almost like flavoured seasoning!

This is a simple side dish that will hopefully give some of you a new idea the next time you find yourself wondering what to do with those carrots or parsnips in your vegetable drawer!


Hummus Coated Carrot and Parsnip Fries
Adapted from Glow Kitchen and Oh She Glows

1 medium-large carrot
1 medium-large parsnip
1/2 tbsp olive oil
2 tbsp hummus (I used a chipotle flavoured hummus)
salt and pepper to taste

Preheat oven to 450°F and line a baking sheet with aluminum foil.

Peel the carrot and parsnip and cut into thin french fry shapes with a knife.  Place in a bowl or other dish so you can toss them in the coating. 

Stir together the olive oil and hummus and add a dash of salt and pepper. Pour over the vegetables and use a spatula or spoon to toss the carrot and parsnip in the hummus mixture, until the fries are evenly coated.  

Transfer fries to the prepared baking sheet and bake in the preheated oven for 25-30 minutes, flipping once halfway through, until the fries are softened and browned on the outside.

Serve warm, with ketchup (if desired). 

Makes 1 serving (the amount shown in the photos).

October 16, 2012

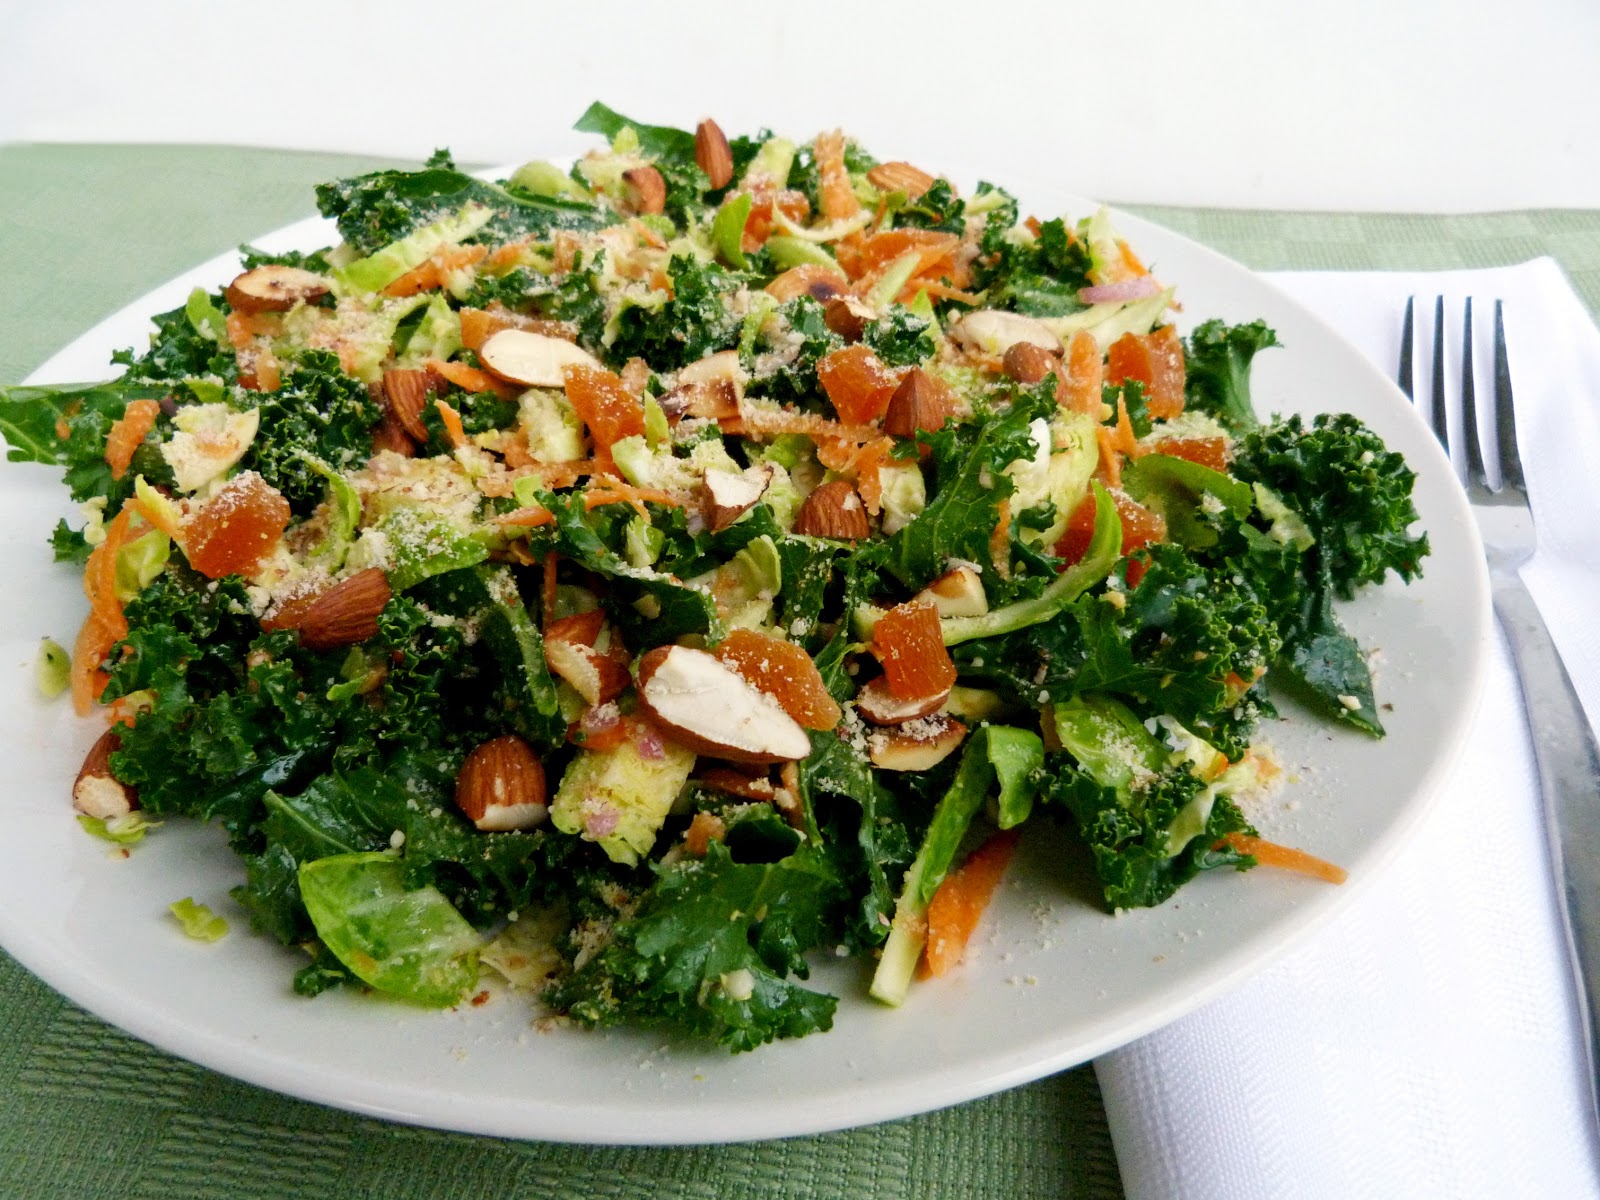
Raw Kale, Almond and Brussels Sprout Salad


When I came home from the farmer's market this past Saturday with a bag full of green veggies, I knew I had to make a big salad with them for dinner!

After searching through my bookmarked recipes, I thought this recipe for Kale and Brussels Sprout salad from Bon Appetit sounded like just the kind of light and healthy Fall salad that I was craving.

The original recipe was pretty simple, with just kale, shredded brussels sprouts, almonds and parmesan as the main ingredients. For my own version, I scaled the recipe down to a single serving and added some shredded carrots and dried apricots, because I love my salads to be full of different ingredients and textures!

I also left out the parmesan and made my own vegan almond parmesan to top my salad with instead.  It's actually really easy to make your own by grinding up a small amount of nuts with nutritional yeast and some garlic powder and salt for extra flavour.

The topping was probably my favourite part of this salad - I loved the garlicky, nutty and cheesy flavour that it added!  I also loved the lemony dressing that soaked into the greens and softened the raw kale a bit, and the layers of crunch from the raw brussels sprouts and the almonds.

If you're not afraid of eating raw kale and brussels sprouts, then you'll love this salad, or if you haven't tried raw brussels sprouts before, then here's your chance!


Raw Kale, Almond and Brussels Sprout Salad
Adapted from Bon Appetit

"Parmesan" Topping:
1 tbsp raw almonds
1 scant tsp nutritional yeast
Dash of garlic powder
Dash of Herbamare seasoning (can substitute salt)

Dressing:
1 tbsp freshly squeezed lemon juice
1/2 tbsp dijon mustard
1/2 tbsp minced shallot
1/2 clove garlic, minced
Pinch of salt and pepper
1-1.5 tbsp olive oil

Salad:
2 cups shredded kale
~3 oz brussels sprouts
1 small carrot
1-2 tbsp chopped almonds
1.5 tbsp chopped dried apricots
dressing + extra olive oil and lemon juice if desired
"parmesan" topping

Make the parmesan topping: add all ingredients to a food processor or a blender that has a grind/crumb function and process until finely ground.  Set aside.

Make the dressing: Whisk the first four ingredients together in a small bowl.  Add salt and pepper to taste.  Whisk in 1 tbsp of olive oil. 

Place the shredded kale in a large bowl.  Cut the bottom ends off the brussels sprouts.  Slice lengthwise into thin slices, then slice the other way so that you get thin shreds.  Add the brussels sprouts to the bowl with the kale.  Peel and grate the carrot and add to the bowl.

Toast the chopped almonds in a dry skillet on medium heat for 2-3 minutes, until they are lightly browned and fragrant.  Add the toasted almonds and and chopped apricots to the salad and mix.

Pour dressing over the salad and toss to coat.  Sprinkle as much of the parmesan topping over the salad as you like (I didn’t use the full amount).  Season with additional freshly ground pepper if desired.

Note: if you find your salad too dry, add another 1/2 tbsp of olive oil and another squeeze of lemon juice.

Note: I think the salad is best if you let the dressing soak for 5-10 minutes before eating.

Makes 1 large serving, or more as a side dish. 

August 19, 2012

Laotian Tofu Larb Lettuce Wraps


A couple of weeks ago, I mentioned a new vegan cookbook that I've been enjoying - Blissful Bites.  When I first looked through the book, this recipe for Laotian larb was one that I skipped over without really stopping to see what it was. With a name that I had never heard of, plus no picture to show me what it was supposed to look like, it just didn't stand out as something I would want to make. And to be honest, something called "larb" didn't sound that appealing to me!

But when I re-read the book looking for recipes I wanted to try next, the ingredients in this recipe made me stop and think - hey, this actually sounds like something that I would love!  It was basically a cold tofu salad with lots of flavourful South-East Asian ingredients that I love to cook with.  Plus it sounded really easy to put together once all the ingredients were prepped!

Before going ahead and making the recipe, I did a bit more internet research on laotian larb and learned that traditionally, the dish is made with minced or ground meat, which can be raw or cooked, and flavoured with fresh herbs, fish sauce and lime juice.


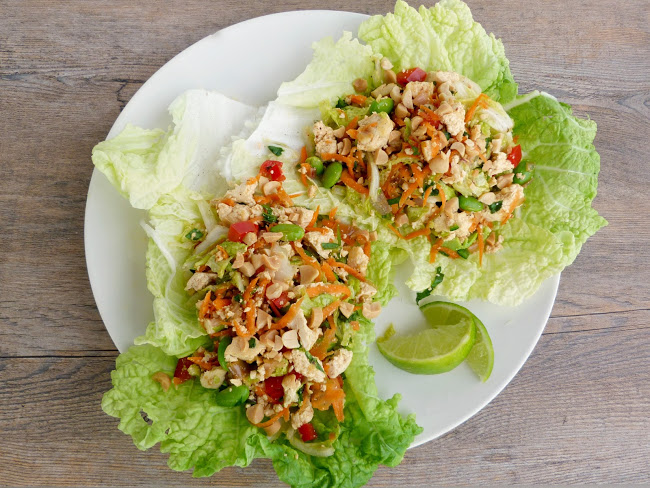
This vegan version replaces the meat with crumbled tofu and the fish sauce with tamari. The recipe also included fresh veggies like shredded cabbage and carrots, and diced red pepper, and I decided to add some shelled edamame as well.

For the herbs, I used the cilantro that the recipe called for, and replaced the mint with Thai basil for more of an authentic flavour.  I also added a few other ingredients to enhance the flavour and spice of the salad, including shallots, garlic and jalapeno. Finally, I decided to brown the tofu in a skillet instead of steaming it, but you could probably just leave it uncooked and the salad would still be good!

After not really knowing what to expect with this dish, I was surprised at how much I enjoyed it! It was light and fresh and the mix of textures and ingredients came together to create such a flavourful salad with the perfect amount of spice for my taste!  You could eat the salad on its own, but I served mine on top of cabbage leaves and rolled it up to eat it like a lettuce wrap.

I'm not sure how authentic my version of Laotian larb was, but all that mattered to me was that I discovered a new dish from a cuisine I hadn't tried before and loved it!


Laotian Tofu Larb Lettuce Wraps
Adapted from Blissful Bites and The Mistress of Spices

1 package (14 oz) firm tofu
1 tsp vegetable oil
1 large shallot, minced
2 cloves garlic, minced
1 cup finely diced red pepper
1/2 cup shelled edamame (thawed if frozen)
~5 leaves napa cabbage, shredded, plus more for serving
1 large carrot, shredded
1 jalapeno or other chile pepper, minced
1/4 cup chopped fresh cilantro
3 tbsp chopped thai basil (can substitute mint)
Juice of 1 lime
3 tbsp tamari or soy sauce
2 tbsp pure maple syrup
Pinch of sea salt
1/3 cup chopped peanuts
Cabbage or lettuce leaves for serving

Drain the tofu and crumble into pieces. 

Heat the oil in a skillet over medium heat. Add the shallot and garlic and cook for 1-2 minutes, stirring often. Add the crumbled tofu and cook for another 5-6 minutes, stirring occasionally.  Remove from heat and transfer mixture to a large bowl.

Add all remaining ingredients to the bowl except for the peanuts and cabbage leaves and stir well to distribute ingredients evenly.  Place the bowl in the fridge to chill for 15-30 minutes.

When ready to serve, spoon large portions onto large cabbage leaves and sprinkle with chopped peanuts (or eat as a salad without the lettuce leaves). 

Makes about 4 servings (or more as an appetizer)

May 16, 2012

Tofu Banh Mi


I don't post a lot of sandwich recipes on my blog because the ones I eat are usually pretty simple, like hummus and veggies on a bagel, tofu salad in a pita, or even plain old peanut butter and jam.

Up until now, my favourite sandwich combination was this pumpernickel sandwich with avocado, sprouts and a white bean spread.  But now there's a new sandwich in town and its ready to take over the number one spot - the banh mi!  Whereas the pumpernickel was soft, creamy, and comforting, this one is sharp, spicy, and in-your-face!

If you haven't heard of banh mi, it's a Vietnamese baguette that is usually made with some kind of meat filling and topped with pickled carrot and daikon radish, cucumber slices, fresh cilantro and a spicy mayonnaise and chili spread.  I had seen recipes for both vegetarian and non-vegetarian versions of this sandwich online, but I had never tried one until a few months ago, when I came across a small take-out restaurant nearby that actually specializes in these popular sandwiches.

They offered a lot of different kinds of banh mi, and luckily there was one vegetarian option on the menu! I watched as the bun was toasted and spread with mayonnaise, then topped with a layer of tofu, followed by pickled vegetables, and whole sprigs of cilantro.  When I got my sandwich home and tried it, I fell in love with the flavour combination.  Even though my mouth was on fire from the spiciness, I couldn't stop eating!


Ever since then, I've wanted to recreate the banh mi myself.  So when I read through the new Vegetarian Times special edition ("Healthy recipes from around the globe") that I received for my birthday and saw a recipe for a tofu bahn mi, I knew I had to make it!

The recipe does require a bit more work than your typical sandwich, because you have to prepare a lot of ingredients and marinate both the tofu and the veggies, but I promise it's worth the effort!  The tofu is marinated in soy sauce and ginger, then sauteed on the stove.  While the tofu is marinating, the carrot and daikon are soaked in a rice vinegar mixture to make them pickled. For the rest of the toppings, you need a large section of cucumber that you can peel lengthwise, and some fresh cilantro with the stems on (this may be the only time I've ever eaten the stems!)

Once all the components are ready, you just need to assemble the sandwich and spread on a layer of mayonnaise (or vegenaise) and as much spicy chili sauce as you like!


I have to say, I definitely enjoyed my homemade version better than the one I got from the restaurant (as is usually the case with homemade vs fast food).  I loved the way each of the flavours played off each other with every bite - the spice from the chili sauce and red pepper flakes, sourness from the pickled veggies, the bite from the fresh cilantro, and even a touch of sweetness.  The tofu had a nice texture and really soaked up the flavours of the marinade.

This was definitely not your ordinary or everyday sandwich, but it was so refreshing to try a new combination of ingredients and toppings!  I made a big batch of each of the components so that I could make a fresh sandwich for dinner three nights in a row, and I enjoyed them just as much each time!

Just make sure you use a sturdy bun because you don't want it get too soggy from the sauces - Vietnamese subs would be best if you can find them, but I just used a French baguette from the grocery store.  You can also toast the bread before hand, but I liked mine soft - it's up to you!


Tofu Banh Mi
Adapted from Vegetarian Times


Per sandwich:
4 oz firm tofu
3/4 tbsp soy sauce
1/2 - 1 tsp minced fresh ginger
1/4 cup rice vinegar
1/2 tsp kosher salt
2 tsp sugar
1/2 tsp red pepper flakes
1/4 cup grated or julienned carrot
1/4 cup grated daikon radish
1/2 tbsp vegetable oil
Vietnamese sub or French baguette
1 tbsp vegenaise or low-fat mayonnaise
1 tsp chili sauce (sriracha), or to taste
~ 6 sprigs of fresh cilantro (including stems)
2 thin slices of cucumber, about 6 inches long

Drain the tofu and slice lengthwise into 1/2 inch thick slices (I used a 12 oz package and got three rectangular slices – enough for three large sandwiches). Press tofu strips between layers of paper towel with a heavy book on top.  Let sit for about 20-30 minutes.

Mix the soy sauce and ginger in a shallow pan or bowl.  Lay the tofu strips in the pan and let marinate for at least 30 minutes, flipping halfway through to coat all sides.

Mix the rice vinegar, salt, sugar, and red pepper flakes in a small bowl and add the grated carrot and daikon. Let sit for about 30 minutes, stirring occasionally.

When the tofu is ready, heat the oil in a large skillet over medium heat. Add the tofu and cook for 3-4 minutes per side.  Remove from heat and transfer to a paper-towel lined plate.

To arrange the sandwich, slice the bun or baguette in half (*Note: you can toast the baguette first if desired by placing it under the broiler for about 5 minutes). Spread the vegenaise on the top half and dot with the chili sauce.  Place the cilantro on the top half.

Place the tofu slice on the bottom half of the baguette. Lay the cucumber slices over the tofu.  Drain the carrot-daikon mixture and place on top of the cucumber. Close sandwich and enjoy!

Makes 1 large sandwich.

May 03, 2012

Spicy Rice Noodle Salad with Tofu


My wishes for warmer weather have finally been answered - today is the first day we've had in weeks where the sun has stayed out and the breeze is nice and warm.  It felt so good to be outside that I actually willingly went for a brief run around the park near my apartment when I got home (trust me, it's been a long time since I've done that!).

The recipe that I have to share with you today is perfect for this weather - a big salad made with rice noodles and full of fruit, veggies, and some tofu for protein, all coated in a spicy pineapple dressing!

The recipe comes from Vegetarian Times, although I made some changes as usual.  I was actually inspired to make it because it called for green curry paste, and I still had some homemade green curry paste leftover from the Thai Green Curry that I made a while ago.

Along with the curry paste, the rest of the dressing is made by blending pineapple juice with other Asian ingredients like soy sauce, ginger, garlic and rice vinegar.  For the salad, I used the red pepper and carrot that the original recipe called for, and I also added bean sprouts, mango and edamame beans.  Since I wanted this to be filling enough to serve as a main course for dinner, I added some tofu that I sliced into thin pieces and sauteed briefly on the stove.

The dish is finished off with a generous sprinkling of fresh cilantro, some hot chilies, and a handful of chopped peanuts.  The result was a very colourful plate with lots of flavour! I also liked that it tasted good warmed up, at room temperature, and straight from the fridge.  I did find it pretty spicy, so feel free to reduce or eliminate the extra red chilies.  I also think fresh pineapple would work well instead of mango.

I hope you're all enjoying the warm weather too... I'm off to make another big salad for tonight's dinner!


Spicy Rice Noodle Salad with Tofu
Adapted from Vegetarian Times


Dressing:
1/2 cup pineapple juice
2 tbsp reduced-sodium soy sauce
3 tbsp fresh ginger, peeled and chopped
3 cloves of garlic, peeled and minced
2 tbsp rice vinegar
1 tbsp vegetable oil
2 tsp Thai green curry paste (I used homemade)
1 tsp palm sugar (or brown sugar)

Salad:
7 oz rice noodles
3 tsp vegetable oil, divided
1 red pepper, thinly sliced
1 ripe mango, thinly sliced
1/2 cup shelled frozen edamame, thawed
1 cup shredded carrot
2 cups bean sprouts
1/2 cup chopped scallion
1/2 cup chopped cilantro, divided
1-2 red chilies, minced (optional)
12-14 oz package firm tofu, drained and pressed with towels for at least 15 minutes
About 1/2 cup finely chopped or crushed peanuts

Place all ingredients for the dressing in a blender and puree until smooth. Set aside.

Place the rice noodles in a bowl or saucepan and cover with boiling water. Let sit for 5-10 minutes, until the noodles are soft (check your package directions – mine needed at least 10-15 minutes).  Drain and rinse with cold water.  Transfer noodles back to the bowl or saucepan and toss with 2 tsp vegetable oil. 

Meanwhile, prepare all the vegetables (red pepper through to chilies) and transfer them to a large bowl. Set aside half of the cilantro for topping. 

Slice the tofu into thin strips.  Heat about 1 tsp of the vegetable oil in a large skillet on medium heat.  Add the tofu pieces and sauté for about 4-5 minutes, stirring often, until lightly browned.

Combine the noodles with the vegetables.  Pour about half of the dressing on top and toss to mix thoroughly, until all the noodles and vegetables are coated.  Add the tofu pieces and pour a bit more dressing over top.  Stir to mix again.  Add more dressing if necessary (you might not need all of it).

Serve immediately, or place salad in the refrigerator to chill until serving time.  Garnish each serving with the remaining cilantro and a handful of crushed peanuts.  


Makes 4-6 servings.


February 20, 2012

Carrot Cake Pancakes with Orange-Cashew Cream


One of my favourite family traditions is Pancake Tuesday. I always looked forward to it because it was the one day of the year when we would get to eat pancakes for dinner.  My parents would cook up a big platter with three or four different kinds of pancakes, and I would try them all!

Blueberry was always my favourite, but we also had chocolate chip, plain, and sometimes an apple-cinnamon or banana version.  Those traditional flavours will always be special to me, but now I like to come up with new kinds of pancakes to try.

My latest favourite is carrot pancakes, because they're just sweet enough for breakfast and I figure since they have a vegetable, they're also appropriate for dinner!  So to celebrate Pancake Day this year, I made these vegan carrot cake pancakes topped with an orange-cashew cream.


The pancakes themselves turned out nice and thick and fluffy, and to get the carrot cake flavor, I added some warm spices, shredded coconut, chopped walnuts and dates to the batter. I also used coconut milk in both the batter and the cashew topping, and topped them with some orange zest.

I also used this opportunity to try my new NuNaturals stevia products.  Instead of adding sugar and vanilla extract to the batter, I used their alcohol-free vanilla stevia drops.  The amount I used added just the right amount of sweetness for my tastes, but my sister thought the pancakes weren't sweet enough, so you might want to use more drops or add 1-2 tsp of sugar or sweetener to the batter if you prefer a sweeter pancake.

These pancakes would taste great on their own or drizzled with maple syrup, but I really liked eating them with the cashew cream that I made by blending a small amount of soaked raw cashews with a bit of orange juice, coconut milk and stevia drops.

Since I was only making a small amount of cashew cream for a single serving, I had a hard time getting the cashews to blend properly so my "cream" was still a bit chunky.  But I still loved the taste and it made a nice topping for the pancakes as a substitute for cream cheese frosting that is usually found on carrot cake.

So if you're looking for new inspiration for Pancake Tuesday, try these carrot cake pancakes or check out the Pinterest Board I created full of more creative pancake ideas!


Single-Serving Vegan Carrot Cake Pancakes with Orange-Cashew Cream
Adapted from The Tie Dye Files and The First Mess

Cashew Cream

2.5 tbsp raw cashews, soaked in water for at least 4-5 hours
1-2 tbsp coconut milk beverage

1 tbsp orange juice

5-10 drops NuNaturals vanilla stevia liquid

Pancakes
1 tsp flax mixed with 2 tsp water
1/3 cup whole wheat flour

2 tbsp rolled oats

2 tbsp sweetened or unsweetened shredded coconut

1 tsp baking powder

1/2 tsp cinnamon

1/8 tsp each nutmeg and ground ginger

1/8 tsp salt

1/3 cup grated carrot

1/2 cup unsweetened coconut milk beverage (or another non-dairy milk)

10 drops NuNaturals vanilla stevia liquid (or 2 tsp sugar)

3-4 dates, soaked in hot water for a few minutes then drained and finely chopped

1 tbsp chopped walnuts


For the cashew cream:

Drain the cashews and place in a food processor or blender. Add remaining ingredients and process until smooth (I would recommend starting with 1 tbsp of coconut milk and add more to thin out the cream if necessary). Set aside or refrigerate if you are making it ahead of time.

For the pancakes:

First, mix the flax with the water and let sit for at least 5 minutes to thicken.


In a large bowl, whisk together all the dry ingredients (flour through to salt).  Add the grated carrot, coconut milk and stevia and stir gently to combine. Fold in the chopped dates and walnuts.


Heat a large skillet on medium-high and spray with low-fat cooking spray. Add the pancake batter to the pan in about 1/3 to 1/2 cup measures (I divided the batter into two large pancakes, but you could easily get three pancakes).


Cook on one side undisturbed for a few minutes, until the bottoms are set and browned. Carefully flip pancakes with a spatula and cook 2-3 more minutes on the other side. 


Serve with cashew cream on top and maple syrup if desired.


Makes 1 serving (2 pancakes)

This was submitted to Wellness Weekend at Diet, Dessert, and Dogs.

February 12, 2012

Morning Glory Muffins


I hope you're not sick of seeing beet recipes on my blog yet, because I've got another one for you today!

I've always thought that beets and carrots make a good combination, and I figured if carrots can be added to baked goods like loaves and muffins, then why not beets?  So I set out to create a hearty muffin full of fruits, veggies and other healthy ingredients.  There were too many different ingredients in these muffins to come up with a concise name, so I'm just calling them morning glory muffins (although I'm not exactly sure what qualifies muffins as morning glory)!

I was worried that these muffins would turn out to be a disaster, and I still wasn't sure about them when I took a bite after taking them out of the oven....but I guess they just needed some more time to sit and cool because I loved them once I tried one the next morning!

The beets gave the muffins a pinkish tint, but their taste didn't overpower the rest of the ingredients. I really liked the combination of beets, carrots and apple, and I loved how every bite was full of different textures.

The ingredients list may look long, but you can customize these based on what you have on hand....for example, if you don't like beets just substitute more carrots, and if you're not a fan of raisins then you can leave them out too.

My only complaint about these muffins is that they didn't rise much in the oven, so they were a bit flat.  These are definitely not the light, sweet cakey type of muffin, but if you like a more dense, hearty muffin then these are for you!


Morning Glory Muffins
Inspired by various recipes like these muffins from Sweet Savory Planet

1/2 cup spelt flour
1/4 tsp baking powder
1/4 tsp baking soda
1/4 tsp salt
1/4 tsp cinnamon
1/8 tsp ground ginger
2 tbsp brown sugar
1/2 cup rolled oats
1/4 cup sweetened shredded coconut
1 tbsp golden flax seeds (optional)
1 tbsp wheat bran or wheat germ (optional)
2 tbsp raisins
2 tbsp chopped walnuts
1/2 cup grated carrot
1/2 cup grated beet
1/2 a small apple, finely diced
1/2 a ripe banana
1.5 tbsp melted coconut oil
2 tbsp unsweetened almond milk (or other non-dairy milk)
2 tbsp orange juice
1 tsp vanilla extract
1 tbsp ground flax

Preheat the oven to 375° and prepare a muffin pan with paper liners.

Whisk together the flour, baking powder, baking soda, salt, and spices in a large bowl. Add the brown sguar, oats, coconut, flax seeds, wheat bran, raisins and walnuts and stir to combine. Next, add the shredded carrot, beet and apple to the bowl and stir until they are coated with the dry ingredients.

In a separate small bowl, mash the banana. Add all the remaining ingredients and stir well to mix.

Add the wet ingredients to the dry ingredients and stir until all the dry ingredients are incorporated.

Divide the batter into the muffin cups, filling each one about three-quarters of the way full. Bake for 23-26 minutes, until the muffins are set and a toothpick comes out clean.

Cool completely on a wire rack.

Makes 8 small muffins.


January 22, 2012

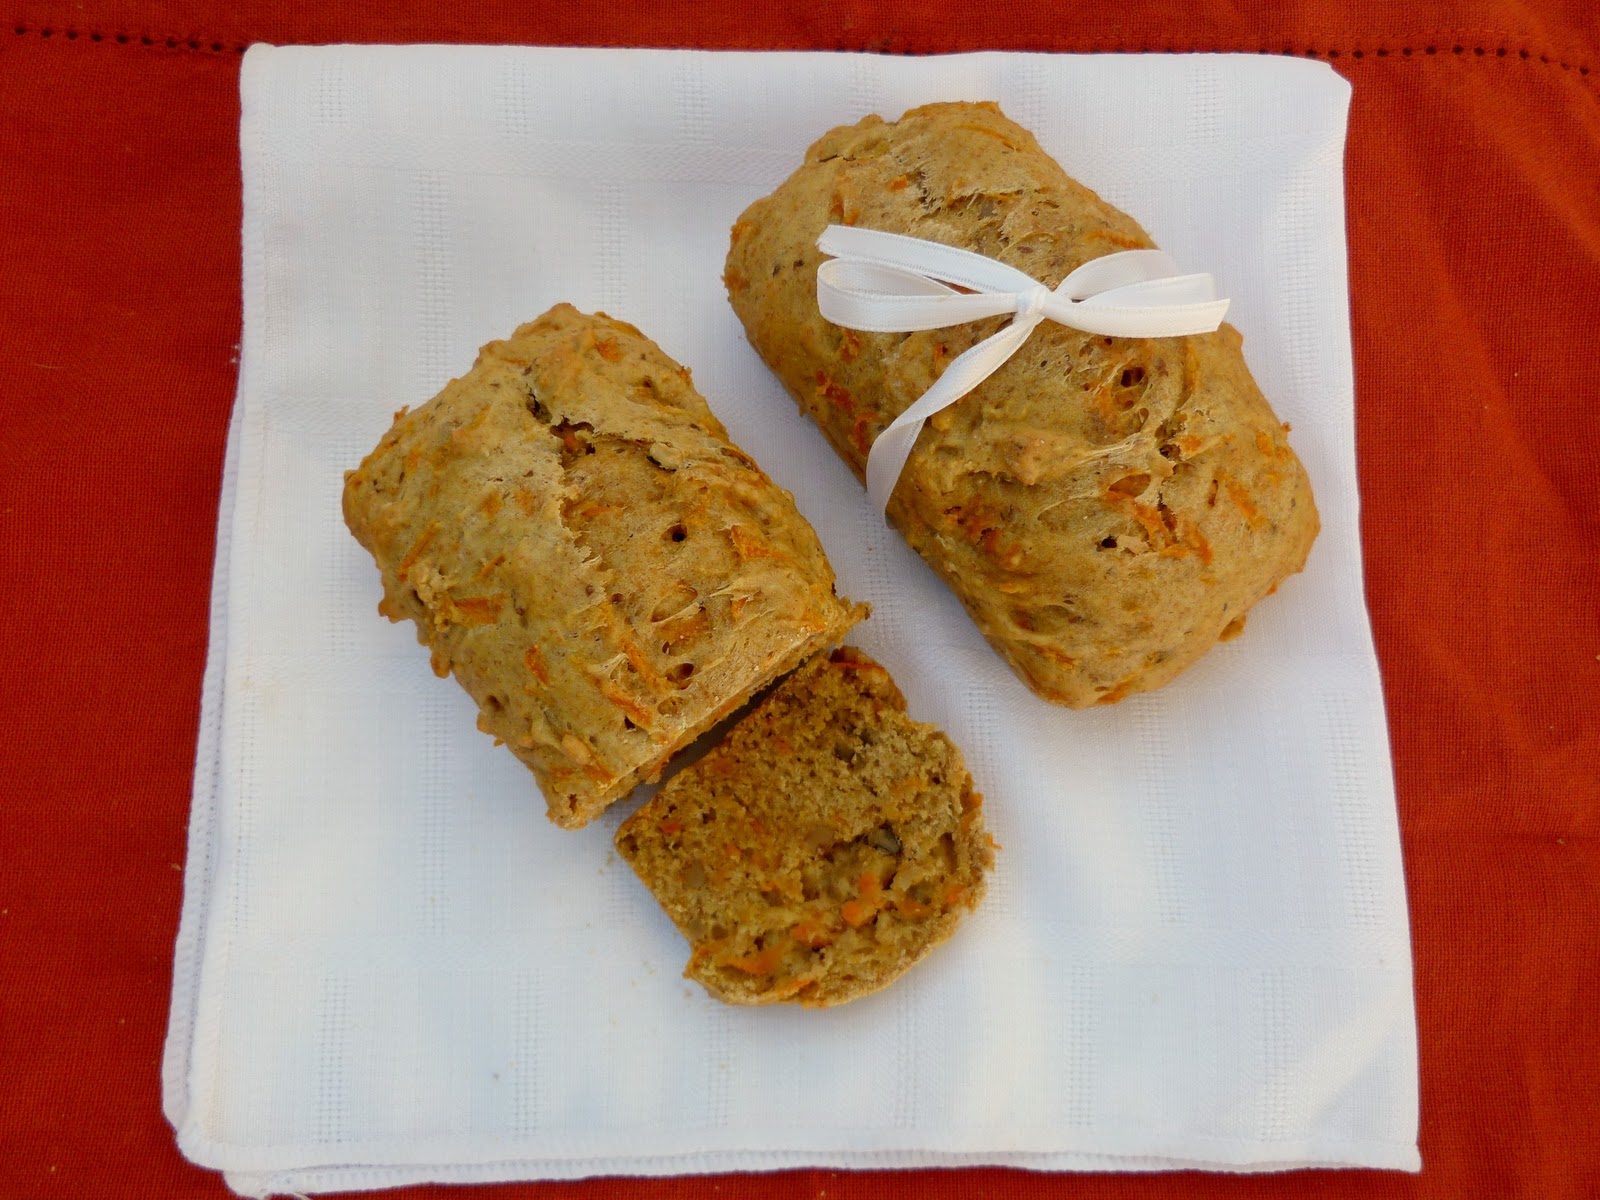
Mini Carrot-Tahini Loaf


One of the recipes that I was excited to try when I got the Vegan Planet cookbook was the Zucchini-Tahini bread. I had never thought to put tahini in baked goods before, but I thought it was such an interesting idea!

Since I had an abundance of carrots at the time, I decided to change the recipe into a carrot-tahini loaf instead of zucchini. I also left out the sesame seeds and added chopped walnuts to the batter, since walnuts usually go well with carrots.

And since I was only making this for myself to eat, I cut the recipe in half and made mini loaves - one to eat right away, and one to freeze for later.


I loved how the loaves turned out! They stayed soft and moist, and they weren't very sweet - which made them perfect for breakfast. Plus they were so cute! I think its more fun to eat things in miniature form, and since the pieces are so small, its easier to slice off just a little bit for a mid-morning or afternoon snack.

I wasn't sure how the tahini would affect the taste and texture, but it was very mild - I probably wouldn't be able to detect it if I didn't know it was there. I think the main purpose of the tahini  is to provide healthy fats and other nutrients, since there is no oil or other source of added fat in the recipe.

I had to restrain myself from adding coconut to the recipe (which I always seem to do!), but I think coconut milk would work well here instead of the almond milk. You could also leave out the walnuts or try adding raisins if you like a more traditional carrot loaf.


Mini Carrot-Tahini Loaf
Adapted from Vegan Planet

1.5 cups all-purpose flour
1/2 tbsp baking powder
1/2 tsp ground ginger
1/4 tsp salt
1/2 tbsp ground flax + 1.5 tbsp water
1/3 cup + 1 tbsp brown sugar
2 tbsp tahini
1/2 cup unsweetened almond milk (or other non-dairy milk)
3/4 cup shredded carrots
2 tbsp chopped walnuts

Preheat oven to 350°. Coat 2 miniature loaf pans with cooking spray.

First, mix together the flax and water and let sit for at least five minutes to thicken.

In a large bowl, whisk together the flour, baking powder, ginger and salt.

In a separate bowl, mix together the brown sugar, tahini, almond milk, and flax mixture. Stir in the grated carrot.

Combine the wet and dry ingredients, stirring just until the dry ingredients are all incorporated. Fold in the chopped walnuts.

Transfer batter to the prepared loaf pans and bake for 30-35 minutes, until a toothpick inserted in the center comes out clean. Let cool in the pan on a wire rack before removing the loaves and slicing.

Makes 2 mini loaves plus 1 extra muffin (*If you want to bake a full-sized loaf, double the recipe and increase baking time to about 1 hour).

December 07, 2011

Indian Pot Pie


I made this recipe once last winter, and I couldn't wait to make it again this year because I loved it so much!  As you may have noticed by now, I'm a big fan of Indian food. I don't often make authentic Indian dishes when I cook for myself, but I do like to incorporate Indian flavours into Western-style foods.

This Indian pot pie is the perfect example of a traditionally American dish that has been updated to include Indian ingredients and flavours. The filling is made of sweet potato, carrots, onion, peas and chickpeas, cooked in a creamy coconut milk sauce and accented by sweet raisins and mango chutney. Then the filling is enclosed in a double-crusted puff pastry pie and baked in the oven until it's hot and bubbling and the crust is golden and crispy.


I was a little too impatient to let the pie cool enough before I cut into it, so it was a bit messy when I tried to photograph it...but it still tasted amazing!  (And since I had leftovers, I was able to take another picture the next day once the filling had firmed up a bit - see below). The filling would taste great eaten on it own like a curry, but I loved cutting a huge slice of pie and eating it together with the puff pastry.

And the best part was that I got to have the whole pie all to myself to enjoy all week long!  But I also think this would be a great dish to share with friends or loved ones, since it's something different than the usual biscuit-topped chicken pot pie and has a sweet and mild curry flavour that anyone would enjoy!


Indian Pot Pie
Adapted from A Good Appetite

1 tbsp vegetable oil
1.5 cups of peeled, diced sweet potatoes
1.5 large carrots (or 2 medium sized), peeled and diced
1 onion, peeled and diced
1.5 tbsp curry powder
salt and pepper
1 cup canned chickpeas, rinsed
1.5 tbsp flour
1 cup vegetable stock
1/2 cup coconut milk
1.5 tbsp mango chutney
1/2 cup frozen peas
1/4 cup golden raisins
2 puff pastry sheets (15 oz package), at room temperature*

Preheat the oven to 425°F.

In a large saucepan, heat the oil over medium heat. Add the diced sweet potato and carrot and cook for about 3 minutes. Add the onion, curry powder, and some salt and pepper. Cook until the onion begins to soften, a few minutes. Stir in the chickpeas. Sprinkle the flour over everything and cook for another minute, stirring.

Add the vegetable stock, coconut milk and mango chutney. Bring the mixture to a boil, then reduce heat and let simmer for about 10-15 minutes, stirring occasionally, until the vegetables are tender and the sauce has thickened. Stir in the peas and raisins and remove from heat.

Roll out one sheet of puff pastry and place on the bottom of a 9-inch pie dish. Transfer the filling to the pie dish, spreading it evenly across the top. Roll out the second piece of puff pastry and lay overtop of the filling, sealing the edges of the two pieces together around the edges. Cut several small slits in the top crust with a knife.

Place the pie in the oven and bake until the crust is golden brown, about 20-25 minutes.

Let cool and slice into pieces. Serve with plain yogurt if desired.

Makes 4 large servings or 5-6 medium sized servings.

*Note: I have only tried the recipe with puff pastry, but feel free to use another type of pastry (like vegan puff pastry, phyllo dough or pie crust) if you prefer - you might need to adjust the cooking time and temperature though.

October 31, 2011

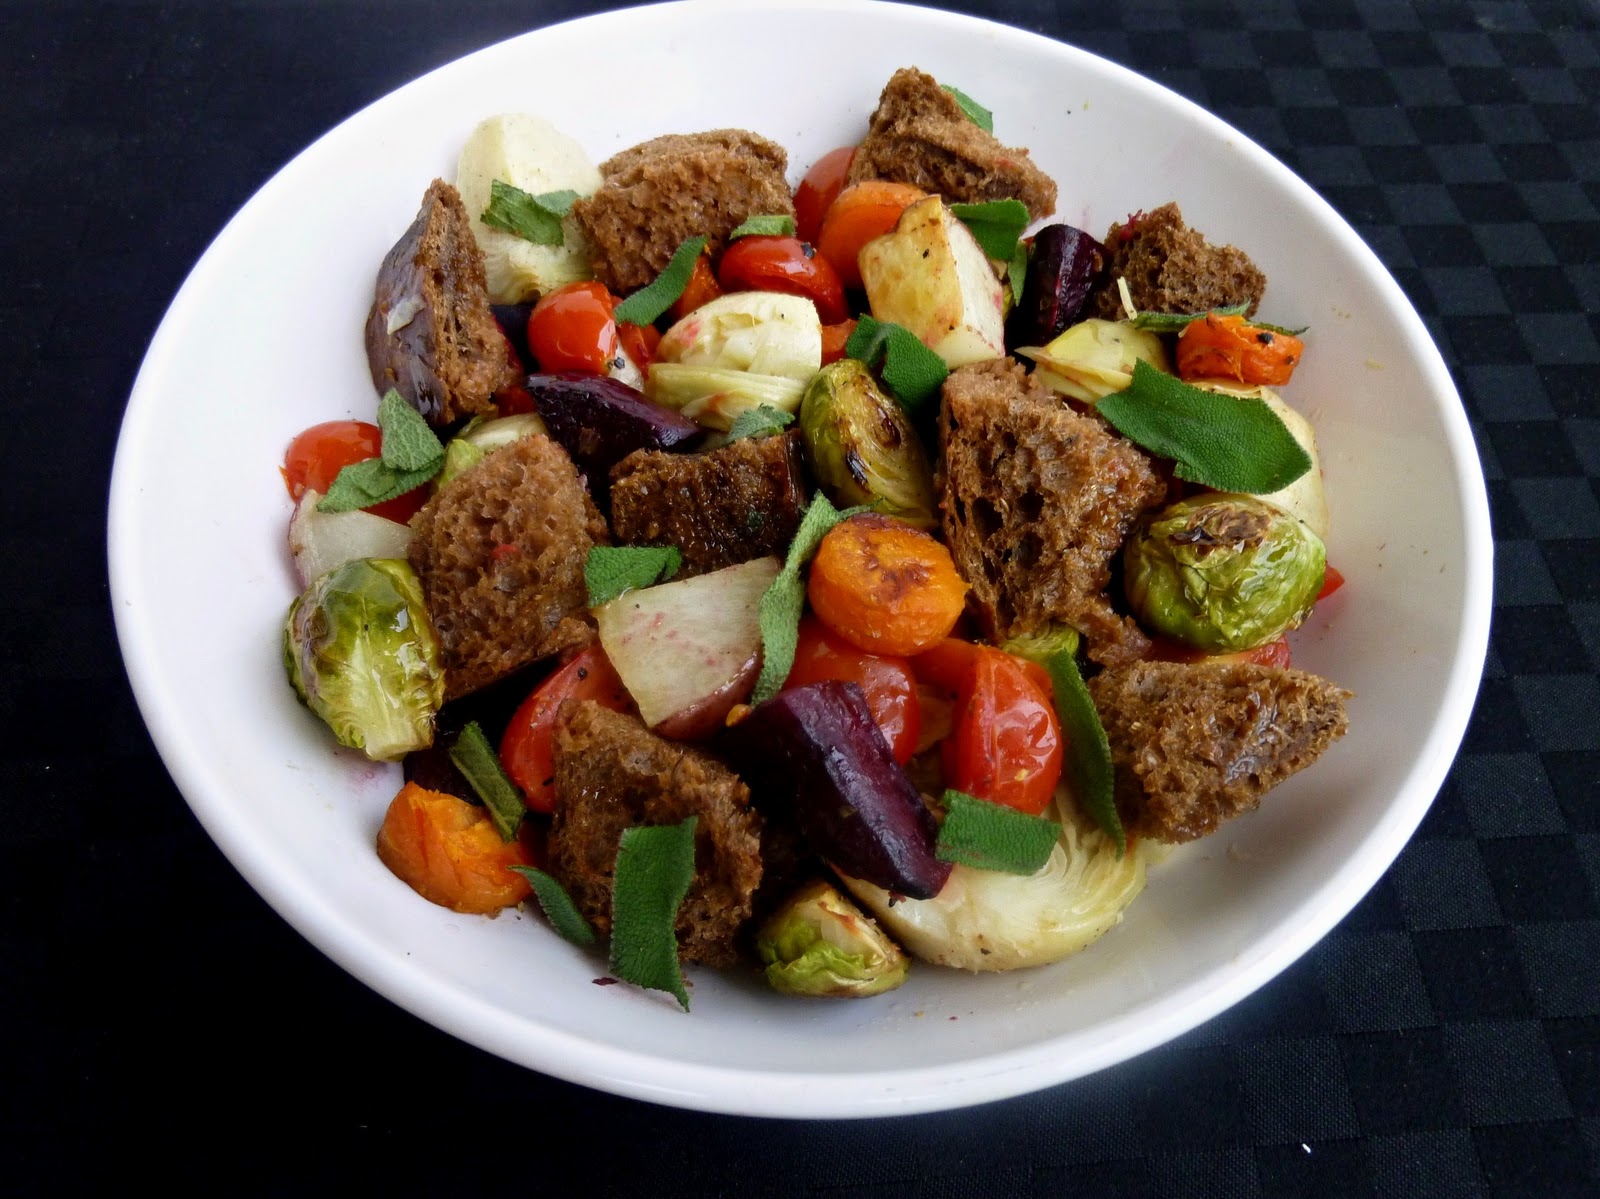
Roasted Winter Panzanella


This summer, I discovered panzanella - a fresh and simple bread salad - and it became my new favourite summertime meal. Then I tried a roasted summer panzanella and liked that even more than the raw version!

But then summer and its fresh produce faded away, so I sadly said goodbye to my beloved panzanella ... until I started seeing versions of winter panzanella on a few blogs, and became inspired to update my roasted panzanella to suit the new season!

I had a lot of choices for ingredients that I could include in my winter panzanella, but I ended up using brussels sprouts, carrots, beets, potatoes and artichokes. I also kept the grape tomatoes from the original version since I think they are an essential part of panzanella, even though they're no longer seasonal.

I also changed up the herbs by using fresh sage instead of basil, and replaced the white bread with pumpernickel to fit the darker winter theme.

I was so excited to try this salad (if you can even classify it as a salad), and it definitely did not disappoint! I loved the variety of roasted veggies tossed with the sage in a light oil and vinegar dressing, and combined with the toasted pumpernickel and juicy tomatoes. The only thing I wasn't crazy about was the artichokes, so I made the salad again without them and enjoyed it even more that way.

This is a great way to use up leftover roasted veggies and is very adaptable - you could try adding squash, parsnips or rutabagas too! I also left out the cheese this time, but would also taste great with some fresh mozzarella or bocconcini balls.


Roasted Winter Panzanella
Inspired by my previous recipe for Roasted Summer Panzanella

1 medium beet, peeled and diced
2 medium carrots, washed and diced
2 small red potatoes (about 8 oz), washed and diced
6 oz brussels sprouts, trimmed and halved
1 tsp dried oregano
About 3/4 cup grape tomatoes, halved
2 cloves of garlic, peeled and smashed
2 thick slices of pumpernickel bread (1-2 cups when cut into pieces)
1 tbsp fresh sage, sliced
2 tbsp olive oil, plus more for roasting
1-2 tbsp balsamic vinegar 
Salt and pepper

Preheat oven to 450°F.

Toss beets with a splash of olive oil, salt and pepper and spread on a large baking tray. Place in the oven and roast for 10 minutes.

Meanwhile, prepare the potatoes, carrots and brussel sprouts and toss with more olive oil, salt, pepper, and oregano. Remove beets from oven and add vegetables to the baking pan along with the beets. Return to oven for 35-40 minutes.

Place the grape tomatoes and garlic in a separate baking dish and toss with some olive oil, salt and pepper. Add to oven for the last 15-20 minutes of roasting time.

Place the slices of bread in the oven for the last 5-10 minutes, until lightly toasted (I placed the slices directly on the oven rack). Remove and slice or tear into bite-sized chunks.

To prepare salad, place all vegetables, bread, and sage in a bowl and toss to mix. Drizzle with about 2 tbsp olive oil and 1-2 tbsp balsamic vinegar. Season with more salt and pepper to taste.

Serve warm.

Makes 2 servings. 

October 12, 2011

Carrot-Parsnip Salad with Curried Tahini Dressing


After a week full of lots of cooking and eating, followed by two Thanksgiving dinners in a row this weekend, I'm ready for some light and healthy meals this week!

This salad, which came from this recipe for Tahini Curried Carrot Salad, definitely fits into that category - ribbons of fresh veggies combined with raisins and sunflower seeds, all coated in a creamy dressing made with tahini. Plus it hardly takes any time to make, since it doesn't involve any actual cooking! I make this a lot for lunches, whenever I'm craving something light and full of veggies!

The recipe is also very adaptable - I rarely make it the same way more than once! You could easily use just carrots, but I really liked the combination of carrots with raw parsnips. You can also cut the vegetables any way you like - I think its fun to create "noodles" by peeling the carrots and parsnips into wide strips, but you could also slice them very thinly into matchsticks.

As for the add-ins, I like to mix in raisins and sunflower seeds, but cranberries and pumpkin seeds would also go really well in this salad. I also added some chopped parsley and sprinkled some unsweetened coconut on top (because I'm obsessed with coconut and I add it to pretty much everything I make lately!), but you could definitely leave that out and the salad would be just as good!


Carrot-Parsnip Salad with Curried Tahini Dressing
Adapted from Healthy.Happy.Life

1 medium carrot, peeled
1 small parsnip, peeled
1-2 tbsp raisins
1-2 tbsp sunflower seeds
1 tbsp chopped parsley
unsweetened coconut for topping (optional)

Dressing:
1 tbsp tahini
2 tsp lemon juice
1 tsp maple syrup or agave nectar
1/2 tsp curry powder
pinch of cayenne

Using a vegetable peeler, peel long strips from the carrot and parsnip, until you reach the core. Place the strips in a bowl and add the raisins and sunflower seeds.

In a small bowl, mix all the dressing ingredients. Add a bit of water if it looks too thick. Pour the dressing over the salad and mix thoroughly until the vegetables are evenly coated.

Top with parsley and coconut if desired.

Makes 1 serving.


For more raw noodle ideas, check out my recipes for raw zucchini and summer squash noodles. I've also tried making butternut squash noodles, but the recipe needs a bit more testing before it's ready to post!  If you have any other ideas for vegetables that can be turned into noodles, let me know!

October 04, 2011

Thanksgiving Week - Day 3: Rosemary Sweet Potato Cornbread


For Day 3 of Thanksgiving Week, I wanted to include a recipe for a bread to serve with the meal. One of my favourite parts of our Thanksgiving dinner is always the basket of fresh bread on the table. In our family, we usually serve fluffy white dinner rolls and slices of artisan loaf, but I know that in other families, hearty biscuits and cornbread are a traditional part of the Thanksgiving spread.

With this in mind, and inspired by an amazing sweet potato cornbread that I recently tried at a restaurant, I set out to find a recipe for a vegan sweet potato cornbread that I could add to my Thanksgiving Week menu. Unfortunately, I didn't have much success in my search so I had to come up with my own version instead. I ended up using a recipe for rosemary sweet potato loaf that I saw on The Baking Duet and adapting it by leaving out the nuts and adding cornmeal.


The result was not quite the same as the restaurant version that I tried, but it still turned out great! This is a nice hearty loaf and is very dense. It has a slightly sweet taste and a nice crunchy crust from the cornmeal.

This is also a very healthy bread, since its made with whole wheat flour and its full of fruits and veggies - bananas, applesauce, sweet potato, and even carrots! (But don't worry, this doesn't taste like banana bread, the banana is just there for texture and moisture).

So if you're looking for a traditional dinner roll or biscuit recipe to serve with your Thanksgiving meal this year, this probably isn't the recipe for you....but if you're willing to try something new and interesting, I would recommend this sweet potato loaf! And don't leave out the branch of fresh rosemary on top of the loaf - it makes for a great presentation!


Rosemary Sweet Potato Cornbread
Adapted from The Baking Duet

1 lb of peeled and diced sweet potato
1/2 ounce fresh rosemary (about 1/2 of a bundle)
2/3 cup mashed ripe banana (about 2 bananas)
1/2 cup unsweetened applesauce
3/4 tsp baking soda, divided
1/2 tsp salt
1 1/4 cups whole wheat flour
3/4 cup medium grind cornmeal
1/4 cup grated carrots

Set aside a large sprig of rosemary and remove the leaves from the remaining sprigs.

Bring 1/2 cup water to a boil in a medium saucepan. Reduce heat to a simmer and add in the rosemary leaves. Let the leaves steep in the water for about 5 minutes.

Add the diced sweet potato to the pot, cover, and steam until potatoes are soft.

Meanwhile, mash the bananas with 1/4 tsp of the baking soda in a large bowl. Mix in the applesauce, salt, and remaining 1/2 tsp baking soda.

When the sweet potatoes are done cooking, drain and rinse off the rosemary, then mash the potatoes until they are creamy.

Add the mashed potatoes to the banana mixture. Stir in the flour and cornmeal, then fold in the grated carrots.

Pour the batter into a greased loaf pan (I used an 8x4 inch pan) and lay the reserved sprig of rosemary on top of the loaf.

Bake at 350°F for 50-60 minutes, until the crust is crisp and a toothpick inserted into the bread comes out clean.

Remove from oven and cool on a wire rack before slicing.


Makes 1 loaf.


Don't Miss:
Thanksgiving Week - Day 3 recipe on Once Upon a Cutting Board: Hearty Sweet Potato Braid - this is another option for your Thanksgiving bread that also uses sweet potato! 


September 23, 2011

Ginger-Peanut Noodles


While I don't like to repeat meals and recipes often, one thing that I do make regularly for a quick and easy dinner is Asian noodles with veggies. I have tried a few different variations on this dish - changing up the vegetables or the sauce, but my favourite version is peanut noodles. I love peanut sauce and it's so easy to make yourself using ingredients from your pantry.

I know there are a ton of recipes out there for peanut noodles already, but this one for a soba noodle salad with ginger peanut dressing from Vegetarian Times that I tried recently was so good that I had to post about it! One thing that makes it different from any other recipe that I've seen is that you actually blend cilantro into the sauce as well as adding fresh cilantro on top. The sauce was delicious - it had the right amount of peanut butter and it was a bit tangy, which I liked.

Another part of this recipe that made it stand out from others was that it includes sliced cucumber, which I have never tried adding to my noodles before, but it was perfect in this recipe!

I loved this recipe on its own, but I think it would also be good with some tofu added in for a more substantial meal.


Ginger-Peanut Noodles
Adapted from Vegetarian Times

6 oz dried noodles, preferable soba noodles but spaghetti would also work (I used kamut udon noodles)
1 red pepper, sliced thinly
about 1/2 to 2/3 of a large English cucumber, peeled, seeded and sliced into half moons
1 large carrot, peeled and grated
1/4 cup chopped fresh cilantro
1/4 cup chopped peanuts

Dressing:
1/2 cup smooth peanut butter
1/4 cup rice vinegar
1 tbsp agave nectar or maple syrup
2 tsp soy sauce
zest and juice of one lime
1 tbsp minced fresh ginger
1 clove of garlic, minced
1/4 cup cilantro
a dash or two of hot sauce, such as Sriracha (optional)

Cook the noodles according to package directions. Drain and rinse with cold water, then set aside.

Prepare all the vegetables (red pepper, cucumber and carrot) and add to noodles.

Add all ingredients for the dressing to a blender or food processor and puree until smooth. Add 1-2 tbsp of water to thin out if necessary.

Pour the dressing over noodles and mix thoroughly. Serve at room temperature or refrigerate until serving time. Garnish each serving with the chopped cilantro and peanuts.

Makes 4 servings.

This recipe was submitted to Wellness Weekends at Diet Dessert & Dogs.

LinkWithin

Related Posts Plugin for WordPress, Blogger...